> ## Documentation Index
> Fetch the complete documentation index at: https://docs.firecrawl.dev/llms.txt
> Use this file to discover all available pages before exploring further.
# クライアントで Firecrawl MCP を設定する
> ホスト型およびローカルの Firecrawl MCP サーバーに対応したクライアント固有の構成。
まずは[Firecrawl MCP への接続](/ja/mcp-server/connect)で、アカウント OAuth、無人での API キーアクセス、またはキーレスアクセスを選択します。以下のクライアント固有の例では、同じアクセスモードに応じた設定を使用します。
## Cursor での実行
ホスト型のキー不要サーバーをワンクリックでインストールできます (API キーは不要です) :
 または、`~/.cursor/mcp.json` に手動で追加します:
```json theme={null}
{
"mcpServers": {
"firecrawl": {
"url": "https://mcp.firecrawl.dev/v2/mcp"
}
}
}
```
または、`~/.cursor/mcp.json` に手動で追加します:
```json theme={null}
{
"mcpServers": {
"firecrawl": {
"url": "https://mcp.firecrawl.dev/v2/mcp"
}
}
}
```
### APIキーを使用してローカルで実行する
注: Cursor バージョン 0.45.6 以降が必要です。
最新の構成手順については、MCPサーバーの構成に関する Cursor 公式ドキュメントを参照してください。
[Cursor MCP Server Configuration Guide](https://cursor.com/docs/context/mcp)
Cursor **v0.48.6** で Firecrawl MCP を構成するには
1. Cursor の設定を開きます
2. Features > MCP Servers に移動します
3. "+ Add new global MCP server" をクリックします
4. 次のコードを入力します:
```json theme={null}
{
"mcpServers": {
"firecrawl-mcp": {
"command": "npx",
"args": ["-y", "firecrawl-mcp"],
"env": {
"FIRECRAWL_API_KEY": "YOUR-API-KEY"
}
}
}
}
```
Cursor **v0.45.6** で Firecrawl MCP を構成するには
1. Cursor の設定を開きます
2. Features > MCP Servers に移動します
3. "+ Add New MCP Server" をクリックします
4. 次の内容を入力します:
* 名前: "firecrawl-mcp" (任意の名前)
* 種類: "command"
* コマンド: `env FIRECRAWL_API_KEY=your-api-key npx -y firecrawl-mcp@3.22.4`
> Windowsで問題が発生する場合は、`cmd /c "set FIRECRAWL_API_KEY=your-api-key && npx -y firecrawl-mcp@3.22.4"` を試してください。
`your-api-key` を Firecrawl APIキーに置き換えてください。まだお持ちでない場合は、アカウントを作成して [https://www.firecrawl.dev/app/api-keys](https://www.firecrawl.dev/app/api-keys) から取得できます。
追加後、MCPサーバーのリストを更新すると、新しいツールが表示されます。Composer Agent は必要に応じて Firecrawl MCP を自動的に使用しますが、必要なWebデータを説明して明示的にリクエストすることもできます。Command+L (Mac) で Composer を開き、送信ボタンの横にある「Agent」を選択して、query を入力します。
## Windsurf での実行
以下を `./codeium/windsurf/model_config.json` に追加します:
```json theme={null}
{
"mcpServers": {
"mcp-server-firecrawl": {
"command": "npx",
"args": ["-y", "firecrawl-mcp"],
"env": {
"FIRECRAWL_API_KEY": "YOUR_API_KEY"
}
}
}
}
```
## Streamable HTTP モードでの実行
デフォルトの stdio トランスポートではなく、Streamable HTTP トランスポートを使用してローカルでサーバーを実行するには:
```bash theme={null}
env HTTP_STREAMABLE_SERVER=true FIRECRAWL_API_KEY=fc-YOUR_API_KEY npx -y firecrawl-mcp@3.22.4
```
ローカルでは [http://localhost:3000/v2/mcp](http://localhost:3000/v2/mcp) を、ホスト型では [https://mcp.firecrawl.dev/v2/mcp](https://mcp.firecrawl.dev/v2/mcp) を使用します
## Smithery を使用したインストール (レガシー)
[Smithery](https://smithery.ai/server/@mendableai/mcp-server-firecrawl) を使って Claude Desktop 用の Firecrawl を自動的にインストールするには:
```bash theme={null}
npx -y @smithery/cli install @mendableai/mcp-server-firecrawl --client claude
```
## VS Code で実行
ワンクリックでインストールするには、以下のいずれかのインストールボタンをクリックしてください。
[](https://insiders.vscode.dev/redirect/mcp/install?name=firecrawl\&inputs=%5B%7B%22type%22%3A%22promptString%22%2C%22id%22%3A%22apiKey%22%2C%22description%22%3A%22Firecrawl%20API%20Key%22%2C%22password%22%3Atrue%7D%5D\&config=%7B%22command%22%3A%22npx%22%2C%22args%22%3A%5B%22-y%22%2C%22firecrawl-mcp%22%5D%2C%22env%22%3A%7B%22FIRECRAWL_API_KEY%22%3A%22%24%7Binput%3AapiKey%7D%22%7D%7D) [](https://insiders.vscode.dev/redirect/mcp/install?name=firecrawl\&inputs=%5B%7B%22type%22%3A%22promptString%22%2C%22id%22%3A%22apiKey%22%2C%22description%22%3A%22Firecrawl%20API%20Key%22%2C%22password%22%3Atrue%7D%5D\&config=%7B%22command%22%3A%22npx%22%2C%22args%22%3A%5B%22-y%22%2C%22firecrawl-mcp%22%5D%2C%22env%22%3A%7B%22FIRECRAWL_API_KEY%22%3A%22%24%7Binput%3AapiKey%7D%22%7D%7D\&quality=insiders)
手動でインストールするには、以下の JSON ブロックを VS Code の User Settings (JSON) ファイルに追加してください。`Ctrl + Shift + P` を押して `Preferences: Open User Settings (JSON)` と入力すると、ファイルを開けます。
```json theme={null}
{
"mcp": {
"inputs": [
{
"type": "promptString",
"id": "apiKey",
"description": "Firecrawl API Key",
"password": true
}
],
"servers": {
"firecrawl": {
"command": "npx",
"args": ["-y", "firecrawl-mcp"],
"env": {
"FIRECRAWL_API_KEY": "${input:apiKey}"
}
}
}
}
}
```
必要に応じて、ワークスペース内の`.vscode/mcp.json`ファイルに追加できます。これにより、構成を他のユーザーと共有できます:
```json theme={null}
{
"inputs": [
{
"type": "promptString",
"id": "apiKey",
"description": "Firecrawl API Key",
"password": true
}
],
"servers": {
"firecrawl": {
"command": "npx",
"args": ["-y", "firecrawl-mcp"],
"env": {
"FIRECRAWL_API_KEY": "${input:apiKey}"
}
}
}
}
```
**注:** VS Code が古いスキーマ形式で JSON を検証するため、MCP Server を追加する際に問題が発生するという報告があります ([microsoft/vscode#155379](https://github.com/microsoft/vscode/issues/155379)) 。
これは Firecrawl を含む複数の MCP ツールに影響します。
**回避策:** MCP Server を正しく読み込めるよう、VS Code の JSON 検証を無効にしてください。
参考: [directus/directus#25906 (コメント) ](https://github.com/directus/directus/issues/25906#issuecomment-3369169513)。
MCP Server は他の拡張機能から呼び出す場合は引き続き正常に動作しますが、この問題は MCP Server リストに直接登録した場合にのみ発生します。VS Code がスキーマ検証を更新したら、ガイダンスを追加する予定です。
## Claude Desktopでの実行
対話形式でアカウントに接続するには、アカウントエンドポイントを追加し、ブラウザでOAuthフローを完了します。
```json theme={null}
{
"mcpServers": {
"firecrawl": {
"url": "https://mcp.firecrawl.dev/v2/mcp-oauth"
}
}
}
```
ユーザー操作なしでの運用やAPIキーを使用する構成では、代わりに `https://mcp.firecrawl.dev/v2/mcp` を使用し、`Authorization: Bearer ` ヘッダーを指定してください。
"Couldn't reach the MCP server" エラーが表示される場合、使用中のClaude DesktopのバージョンがStreamable HTTPトランスポートに対応していない可能性があります。代わりにローカルのnpx方式を使用してください ([Node.js](https://nodejs.org) が必要です) :
```json theme={null}
{
"mcpServers": {
"firecrawl": {
"command": "npx",
"args": ["-y", "firecrawl-mcp"],
"env": {
"FIRECRAWL_API_KEY": "YOUR_API_KEY"
}
}
}
}
```
`spawn npx ENOENT` エラーが表示される場合は、Node.js がインストールされていないか、システムの PATH に含まれていません。[nodejs.org](https://nodejs.org) から Node.js (LTS 版) をインストールしてから、Claude Desktop を完全に再起動してください。Windows では、コマンド プロンプトで `where npx` を実行し、完全なパス (例:`C:\\Program Files\\nodejs\\npx.cmd`) を `command` の値として指定することもできます。
## Claude Code での実行
Claude Code CLI を使用して Firecrawl MCP server を追加します。リモートホストのURLを使用するか、ローカルで実行できます。
```bash theme={null}
# 対話形式でのアカウント接続(推奨)
claude mcp add --transport http firecrawl https://mcp.firecrawl.dev/v2/mcp-oauth
# 対話なしでAPIキーを構成する場合は、Authorizationヘッダーを使用します
claude mcp add --transport http firecrawl https://mcp.firecrawl.dev/v2/mcp --header "Authorization: Bearer "
# または npx でローカル実行
claude mcp add firecrawl -e FIRECRAWL_API_KEY=fc-your-api-key -- npx -y firecrawl-mcp@3.22.4
```
## Google Antigravity での実行
Google Antigravity では、Agent インターフェースから MCP Server を直接構成できます。
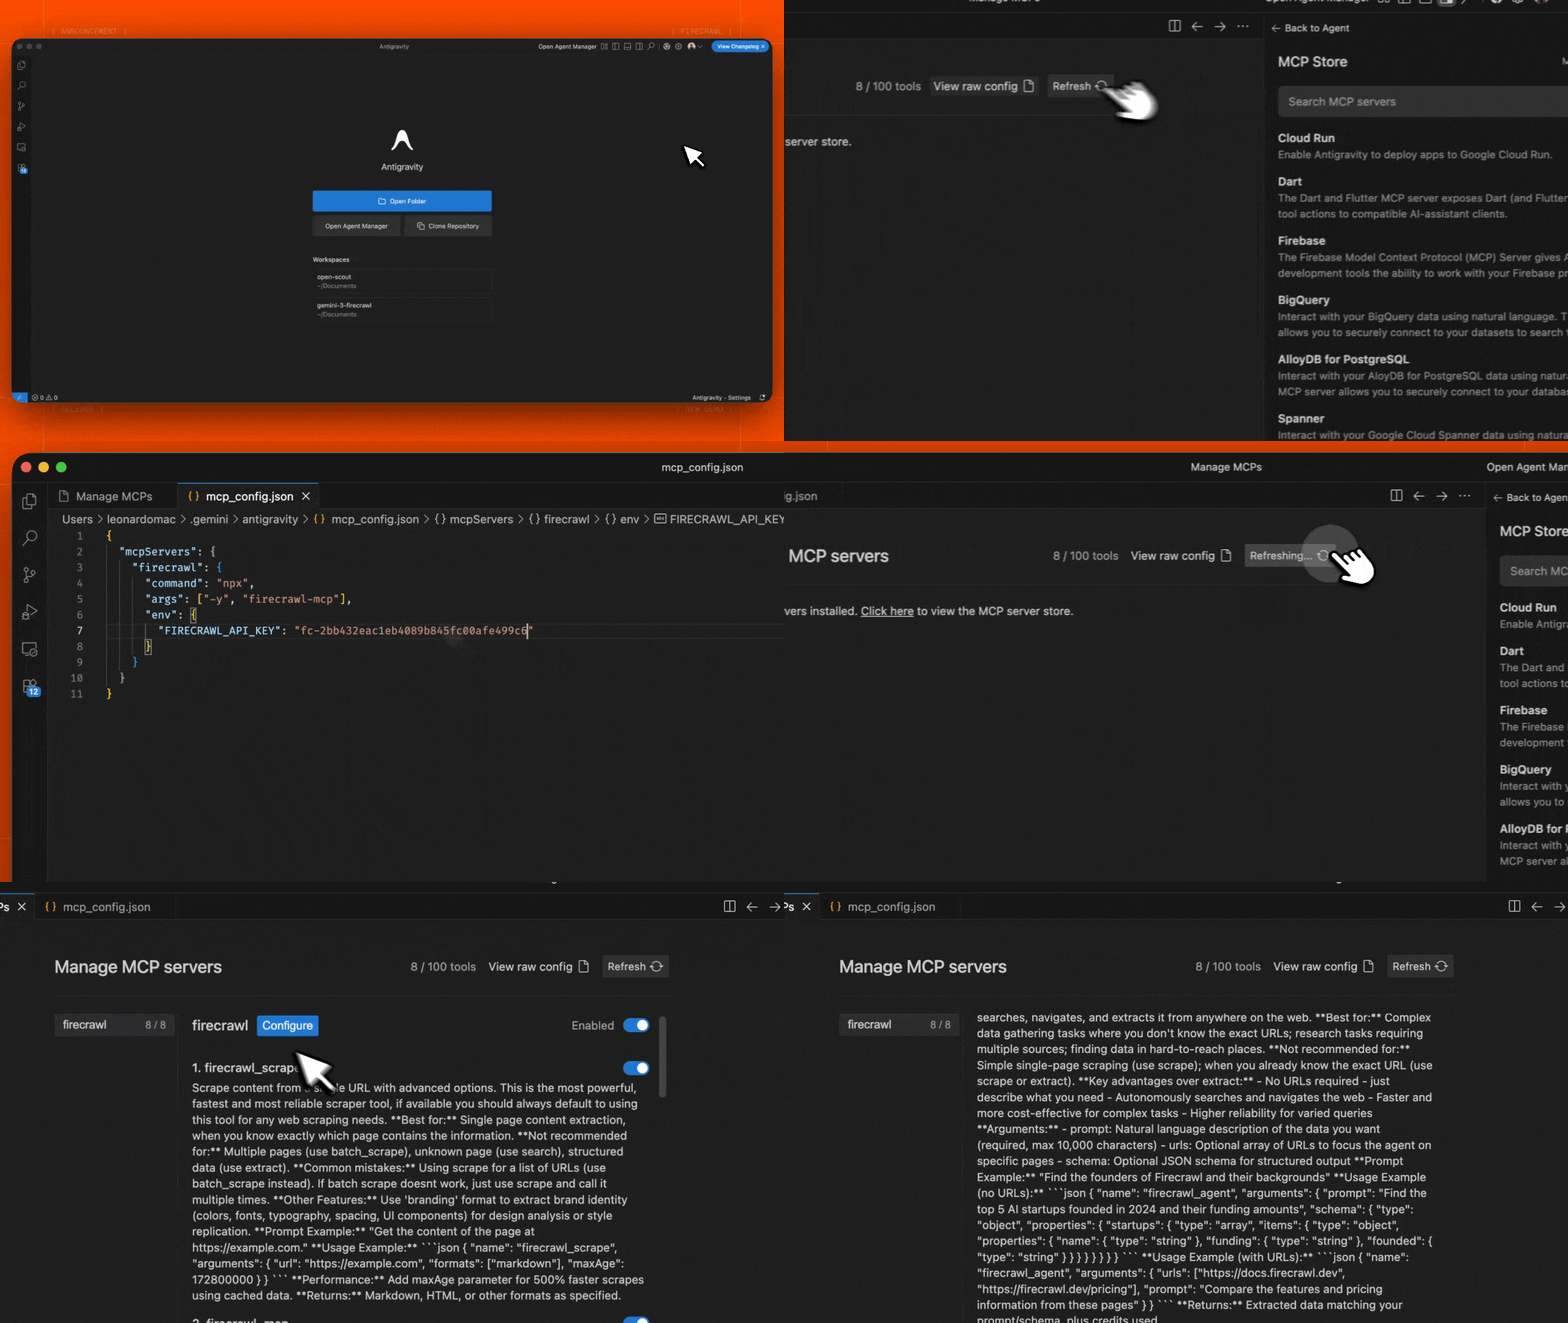 1. Editor の Agent サイドバー、または Agent Manager ビューを開きます
2. "..." (その他のアクション) メニューをクリックし、**MCP Servers** を選択します
3. **View raw config** を選択して、ローカルの `mcp_config.json` ファイルを開きます
4. 次の構成を追加します。
```json theme={null}
{
"mcpServers": {
"firecrawl": {
"command": "npx",
"args": ["-y", "firecrawl-mcp"],
"env": {
"FIRECRAWL_API_KEY": "YOUR_FIRECRAWL_API_KEY"
}
}
}
}
```
5. ファイルを保存し、Antigravity MCP インターフェースで **Refresh** をクリックして新しいツールを確認します
`YOUR_FIRECRAWL_API_KEY` を、[https://firecrawl.dev/app/api-keys](https://www.firecrawl.dev/app/api-keys) で取得した API キーに置き換えます。
1. Editor の Agent サイドバー、または Agent Manager ビューを開きます
2. "..." (その他のアクション) メニューをクリックし、**MCP Servers** を選択します
3. **View raw config** を選択して、ローカルの `mcp_config.json` ファイルを開きます
4. 次の構成を追加します。
```json theme={null}
{
"mcpServers": {
"firecrawl": {
"command": "npx",
"args": ["-y", "firecrawl-mcp"],
"env": {
"FIRECRAWL_API_KEY": "YOUR_FIRECRAWL_API_KEY"
}
}
}
}
```
5. ファイルを保存し、Antigravity MCP インターフェースで **Refresh** をクリックして新しいツールを確認します
`YOUR_FIRECRAWL_API_KEY` を、[https://firecrawl.dev/app/api-keys](https://www.firecrawl.dev/app/api-keys) で取得した API キーに置き換えます。
## n8n での実行
n8n で Firecrawl MCP server に接続するには、次の手順に従います。
1. [https://firecrawl.dev/app/api-keys](https://www.firecrawl.dev/app/api-keys) から Firecrawl APIキーを取得します
2. n8n のワークフローに **AI Agent** ノードを追加します
3. AI Agent の構成で、新しい **Tool** を追加します
4. ツールタイプとして **MCP Client Tool** を選択します
5. MCP server のエンドポイントを入力します:
```
https://mcp.firecrawl.dev/v2/mcp
```
6. **Server Transport** を **HTTP Streamable** に設定します
7. **Authentication** を **Bearer** に設定して Firecrawl APIキーを貼り付けるか、キーなしのFreeティアを使用する場合は **None** のままにします
8. **Tools to include** では、**All**、**Selected**、または **All Except** を選択できます。これにより、Firecrawl ツール (スクレイピング、クロール、マップ、検索、抽出など) が利用可能になります
セルフホスト環境では、npx で MCP Server を実行し、HTTP トランスポートモードを有効にします:
```bash theme={null}
env HTTP_STREAMABLE_SERVER=true \
FIRECRAWL_API_KEY=fc-YOUR_API_KEY \
FIRECRAWL_API_URL=YOUR_FIRECRAWL_INSTANCE \
npx -y firecrawl-mcp@3.22.4
```
これにより、サーバーが `http://localhost:3000/v2/mcp` で起動します。この URL は、n8n ワークフローのエンドポイントとして使用できます。n8n では HTTP トランスポートが必要なため、環境変数 `HTTP_STREAMABLE_SERVER=true` の設定が必要です。