> ## Documentation Index
> Fetch the complete documentation index at: https://docs.firecrawl.dev/llms.txt
> Use this file to discover all available pages before exploring further.
# Firecrawl + n8n
> Learn how to use Firecrawl with n8n for web scraping automation, a complete step-by-step guide.
## Introduction to Firecrawl and n8n
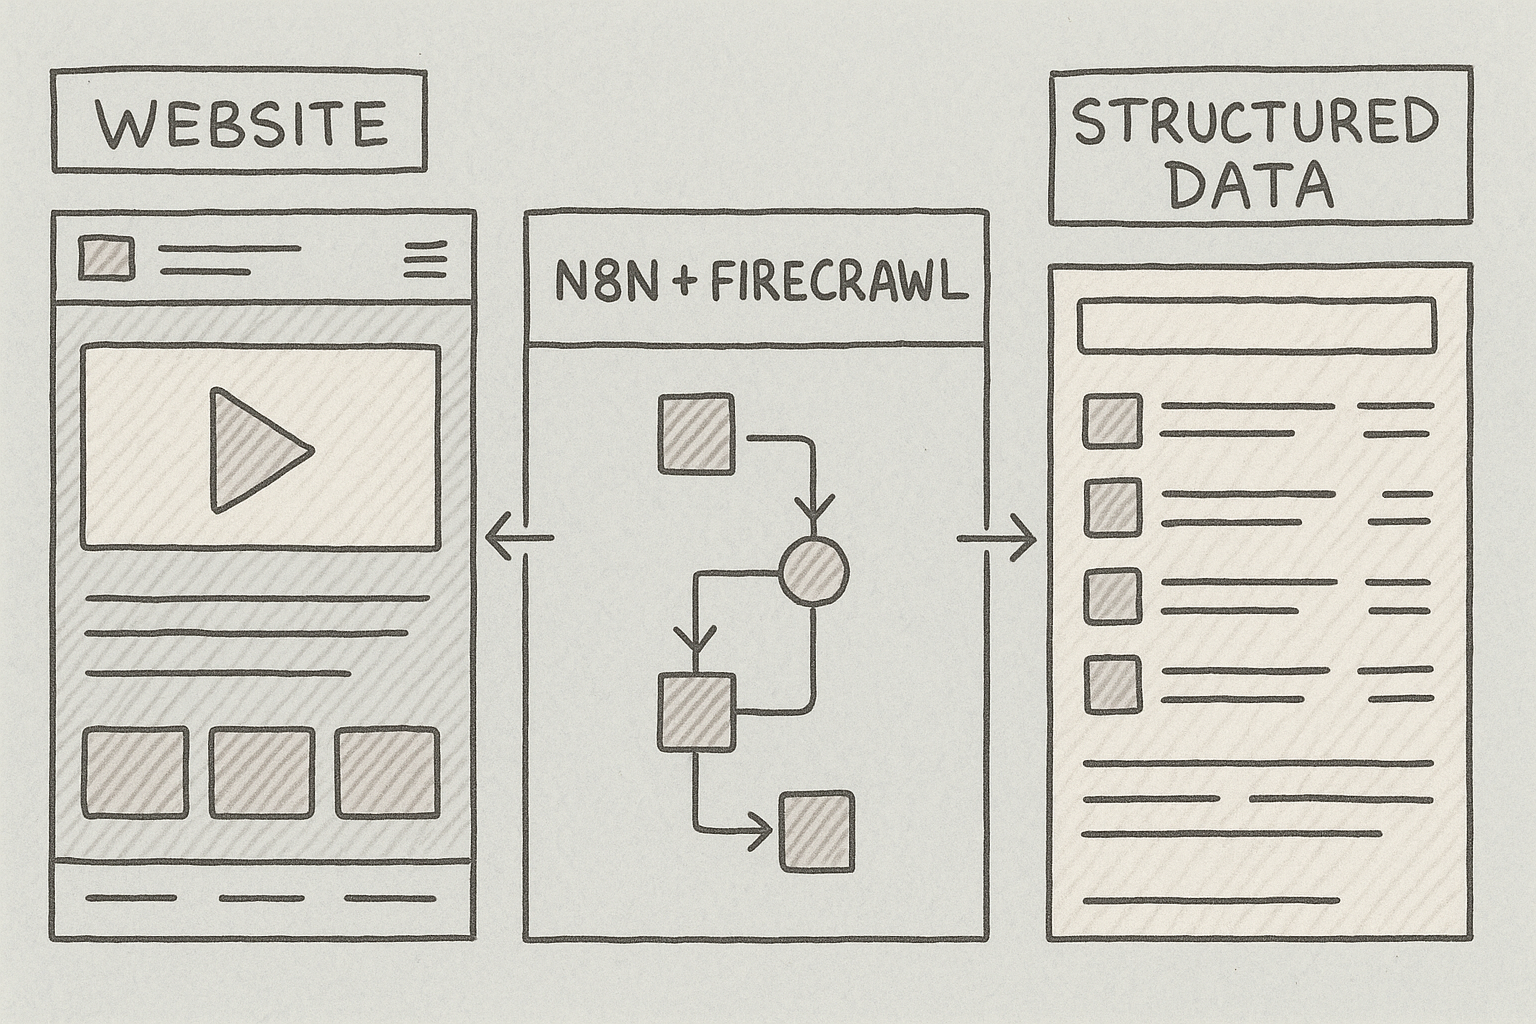
Web scraping automation has become essential for modern businesses. Whether you need to monitor competitor prices, aggregate content, generate leads, or power AI applications with real-time data, the combination of Firecrawl and n8n provides a powerful solution without requiring programming knowledge.
 **What is n8n?**
n8n is an open-source workflow automation platform that connects different tools and services together. Think of it as a visual programming environment where you drag and drop nodes onto a canvas, connect them, and create automated workflows. With over 400 integrations, n8n lets you build complex automations without writing code.
## Why Use Firecrawl with n8n?
Traditional web scraping presents several challenges. Custom scripts break when websites update their structure. Anti-bot systems block automated requests. JavaScript-heavy sites don't render properly. Infrastructure requires constant maintenance.
Firecrawl handles these technical complexities on the scraping side, while n8n provides the automation framework. Together, they let you build production-ready workflows that:
* Extract data from any website reliably
* Connect scraped data to other business tools
* Run on schedules or triggered by events
* Scale from simple tasks to complex pipelines
This guide will walk you through setting up both platforms and building your first scraping workflow from scratch.
## Step 1: Create Your Firecrawl Account
Firecrawl provides the web scraping capabilities for your workflows. Let's set up your account and get your API credentials.
### Sign Up for Firecrawl
1. Navigate to [firecrawl.dev](https://firecrawl.dev) in your web browser
2. Click the "Get Started" or "Sign Up" button
3. Create an account using your email address or GitHub login
4. Verify your email if prompted
### Get Your API Key
After signing in, you need an API key to connect Firecrawl to n8n:
1. Go to your Firecrawl dashboard
2. Navigate to the [API Keys page](https://www.firecrawl.dev/app/api-keys)
3. Click "Create New API Key"
4. Give your key a descriptive name (e.g., "n8n Integration")
5. Copy the generated API key and save it somewhere secure
**What is n8n?**
n8n is an open-source workflow automation platform that connects different tools and services together. Think of it as a visual programming environment where you drag and drop nodes onto a canvas, connect them, and create automated workflows. With over 400 integrations, n8n lets you build complex automations without writing code.
## Why Use Firecrawl with n8n?
Traditional web scraping presents several challenges. Custom scripts break when websites update their structure. Anti-bot systems block automated requests. JavaScript-heavy sites don't render properly. Infrastructure requires constant maintenance.
Firecrawl handles these technical complexities on the scraping side, while n8n provides the automation framework. Together, they let you build production-ready workflows that:
* Extract data from any website reliably
* Connect scraped data to other business tools
* Run on schedules or triggered by events
* Scale from simple tasks to complex pipelines
This guide will walk you through setting up both platforms and building your first scraping workflow from scratch.
## Step 1: Create Your Firecrawl Account
Firecrawl provides the web scraping capabilities for your workflows. Let's set up your account and get your API credentials.
### Sign Up for Firecrawl
1. Navigate to [firecrawl.dev](https://firecrawl.dev) in your web browser
2. Click the "Get Started" or "Sign Up" button
3. Create an account using your email address or GitHub login
4. Verify your email if prompted
### Get Your API Key
After signing in, you need an API key to connect Firecrawl to n8n:
1. Go to your Firecrawl dashboard
2. Navigate to the [API Keys page](https://www.firecrawl.dev/app/api-keys)
3. Click "Create New API Key"
4. Give your key a descriptive name (e.g., "n8n Integration")
5. Copy the generated API key and save it somewhere secure
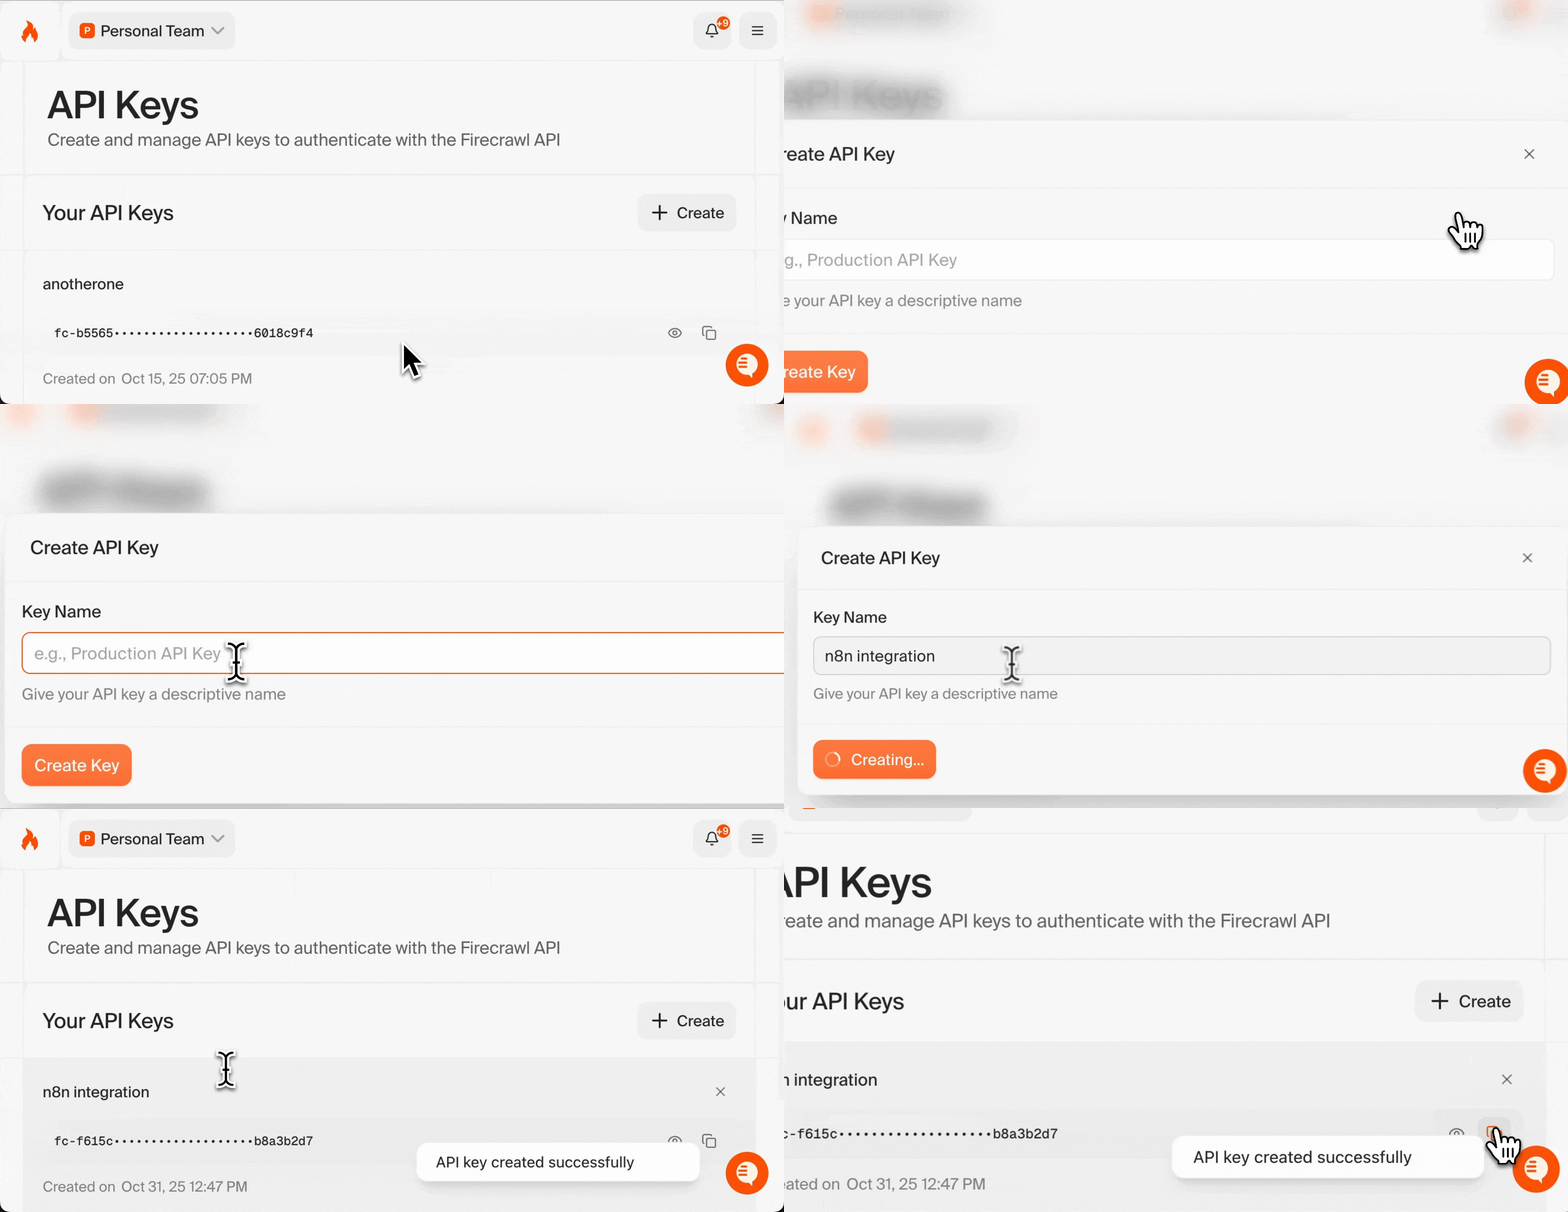 Your API key is like a password. Keep it secure and never share it publicly. You'll need this key in the next section.
Firecrawl provides free credits when you sign up, which is enough to test your workflows and complete this tutorial.
## Step 2: Set Up n8n
n8n offers two deployment options: cloud-hosted or self-hosted. For beginners, the cloud version is the fastest way to get started.
### Choose Your n8n Version
**n8n Cloud (Recommended for beginners):**
* No installation required
* Free tier available
* Managed infrastructure
* Automatic updates
**Self-Hosted:**
* Complete data control
* Run on your own servers
* Requires Docker installation
* Good for advanced users with specific security requirements
Choose the option that fits your needs. Both paths will lead you to the same workflow editor interface.
### Option A: n8n Cloud (Recommended for Beginners)
1. Visit [n8n.cloud](https://n8n.cloud)
2. Click "Start Free" or "Sign Up"
3. Register using your email address or GitHub
4. Complete the verification process
5. You'll be directed to your n8n dashboard
Your API key is like a password. Keep it secure and never share it publicly. You'll need this key in the next section.
Firecrawl provides free credits when you sign up, which is enough to test your workflows and complete this tutorial.
## Step 2: Set Up n8n
n8n offers two deployment options: cloud-hosted or self-hosted. For beginners, the cloud version is the fastest way to get started.
### Choose Your n8n Version
**n8n Cloud (Recommended for beginners):**
* No installation required
* Free tier available
* Managed infrastructure
* Automatic updates
**Self-Hosted:**
* Complete data control
* Run on your own servers
* Requires Docker installation
* Good for advanced users with specific security requirements
Choose the option that fits your needs. Both paths will lead you to the same workflow editor interface.
### Option A: n8n Cloud (Recommended for Beginners)
1. Visit [n8n.cloud](https://n8n.cloud)
2. Click "Start Free" or "Sign Up"
3. Register using your email address or GitHub
4. Complete the verification process
5. You'll be directed to your n8n dashboard
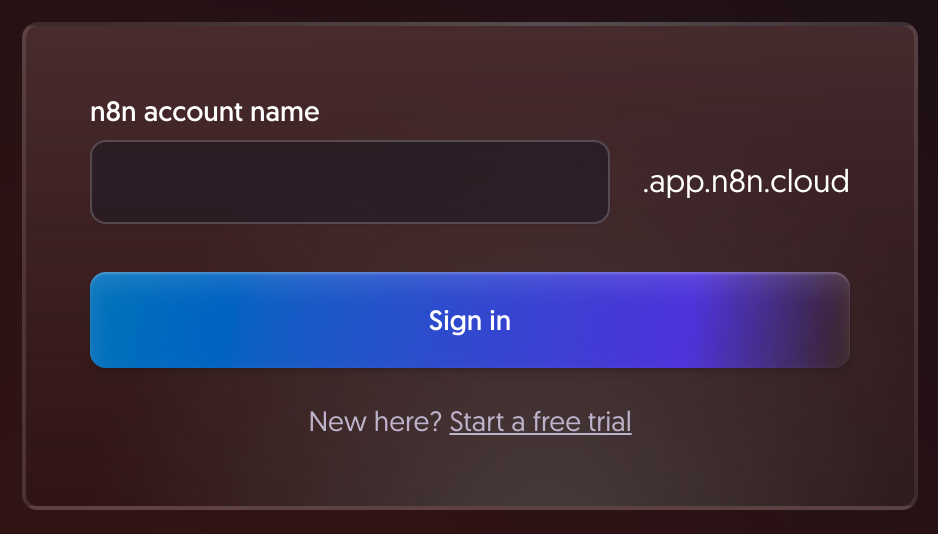 The free tier provides everything you need to build and test workflows. You can upgrade later if you need more execution time or advanced features.
### Option B: Self-Hosted with Docker
If you prefer to run n8n on your own infrastructure, you can set it up quickly using Docker.
**Prerequisites:**
* [Docker Desktop](https://www.docker.com/products/docker-desktop/) installed on your computer
* Basic familiarity with command line/terminal
**Installation Steps:**
1. Open your terminal or command prompt
2. Create a Docker volume to persist your workflow data:
```bash theme={null}
docker volume create n8n_data
```
This volume stores your workflows, credentials, and execution history so they persist even if you restart the container.
3. Run the n8n Docker container:
```bash theme={null}
docker run -it --rm --name n8n -p 5678:5678 -v n8n_data:/home/node/.n8n docker.n8n.io/n8nio/n8n
```
The free tier provides everything you need to build and test workflows. You can upgrade later if you need more execution time or advanced features.
### Option B: Self-Hosted with Docker
If you prefer to run n8n on your own infrastructure, you can set it up quickly using Docker.
**Prerequisites:**
* [Docker Desktop](https://www.docker.com/products/docker-desktop/) installed on your computer
* Basic familiarity with command line/terminal
**Installation Steps:**
1. Open your terminal or command prompt
2. Create a Docker volume to persist your workflow data:
```bash theme={null}
docker volume create n8n_data
```
This volume stores your workflows, credentials, and execution history so they persist even if you restart the container.
3. Run the n8n Docker container:
```bash theme={null}
docker run -it --rm --name n8n -p 5678:5678 -v n8n_data:/home/node/.n8n docker.n8n.io/n8nio/n8n
```
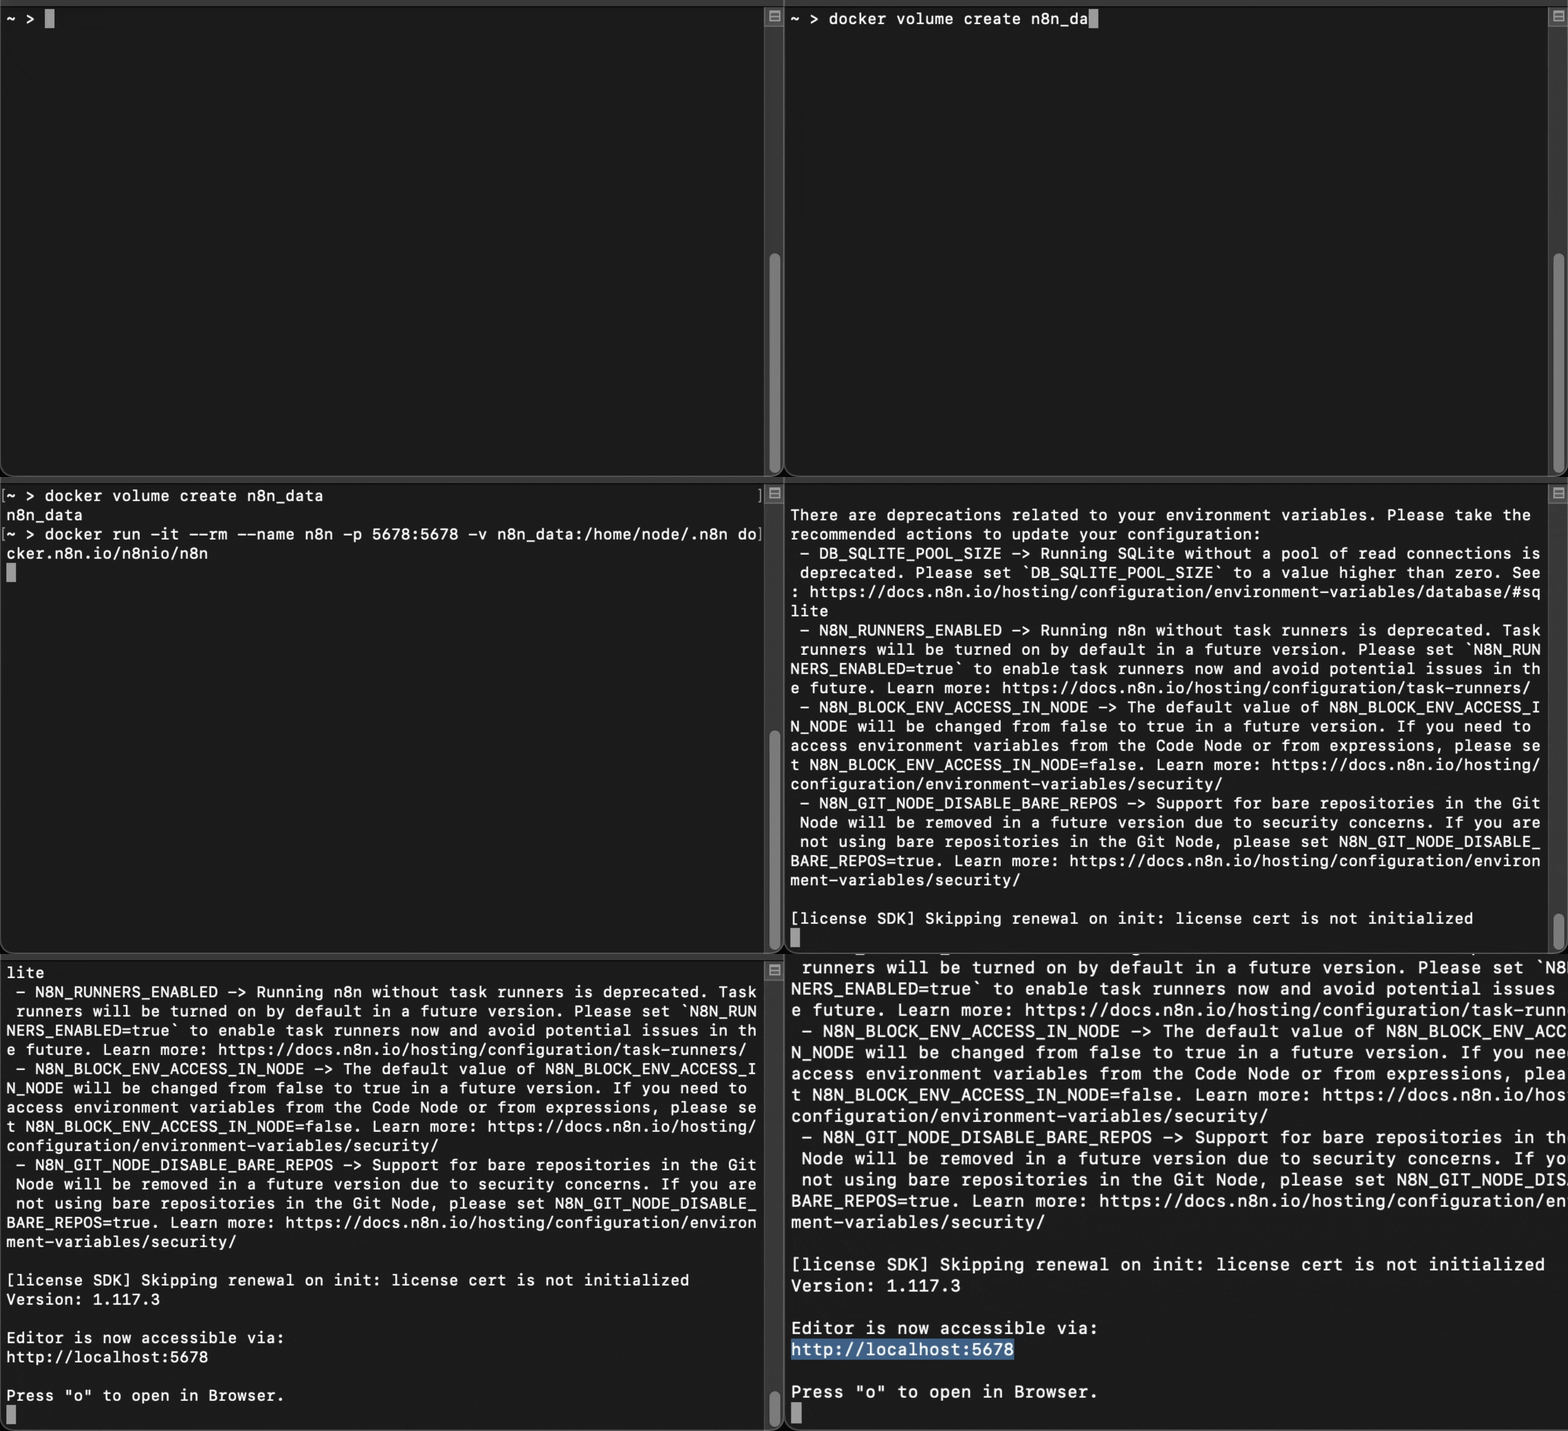 4. Wait for n8n to start. You'll see output indicating the server is running
5. Open your web browser and navigate to `http://localhost:5678`
6. Create your n8n account by registering with an email
4. Wait for n8n to start. You'll see output indicating the server is running
5. Open your web browser and navigate to `http://localhost:5678`
6. Create your n8n account by registering with an email
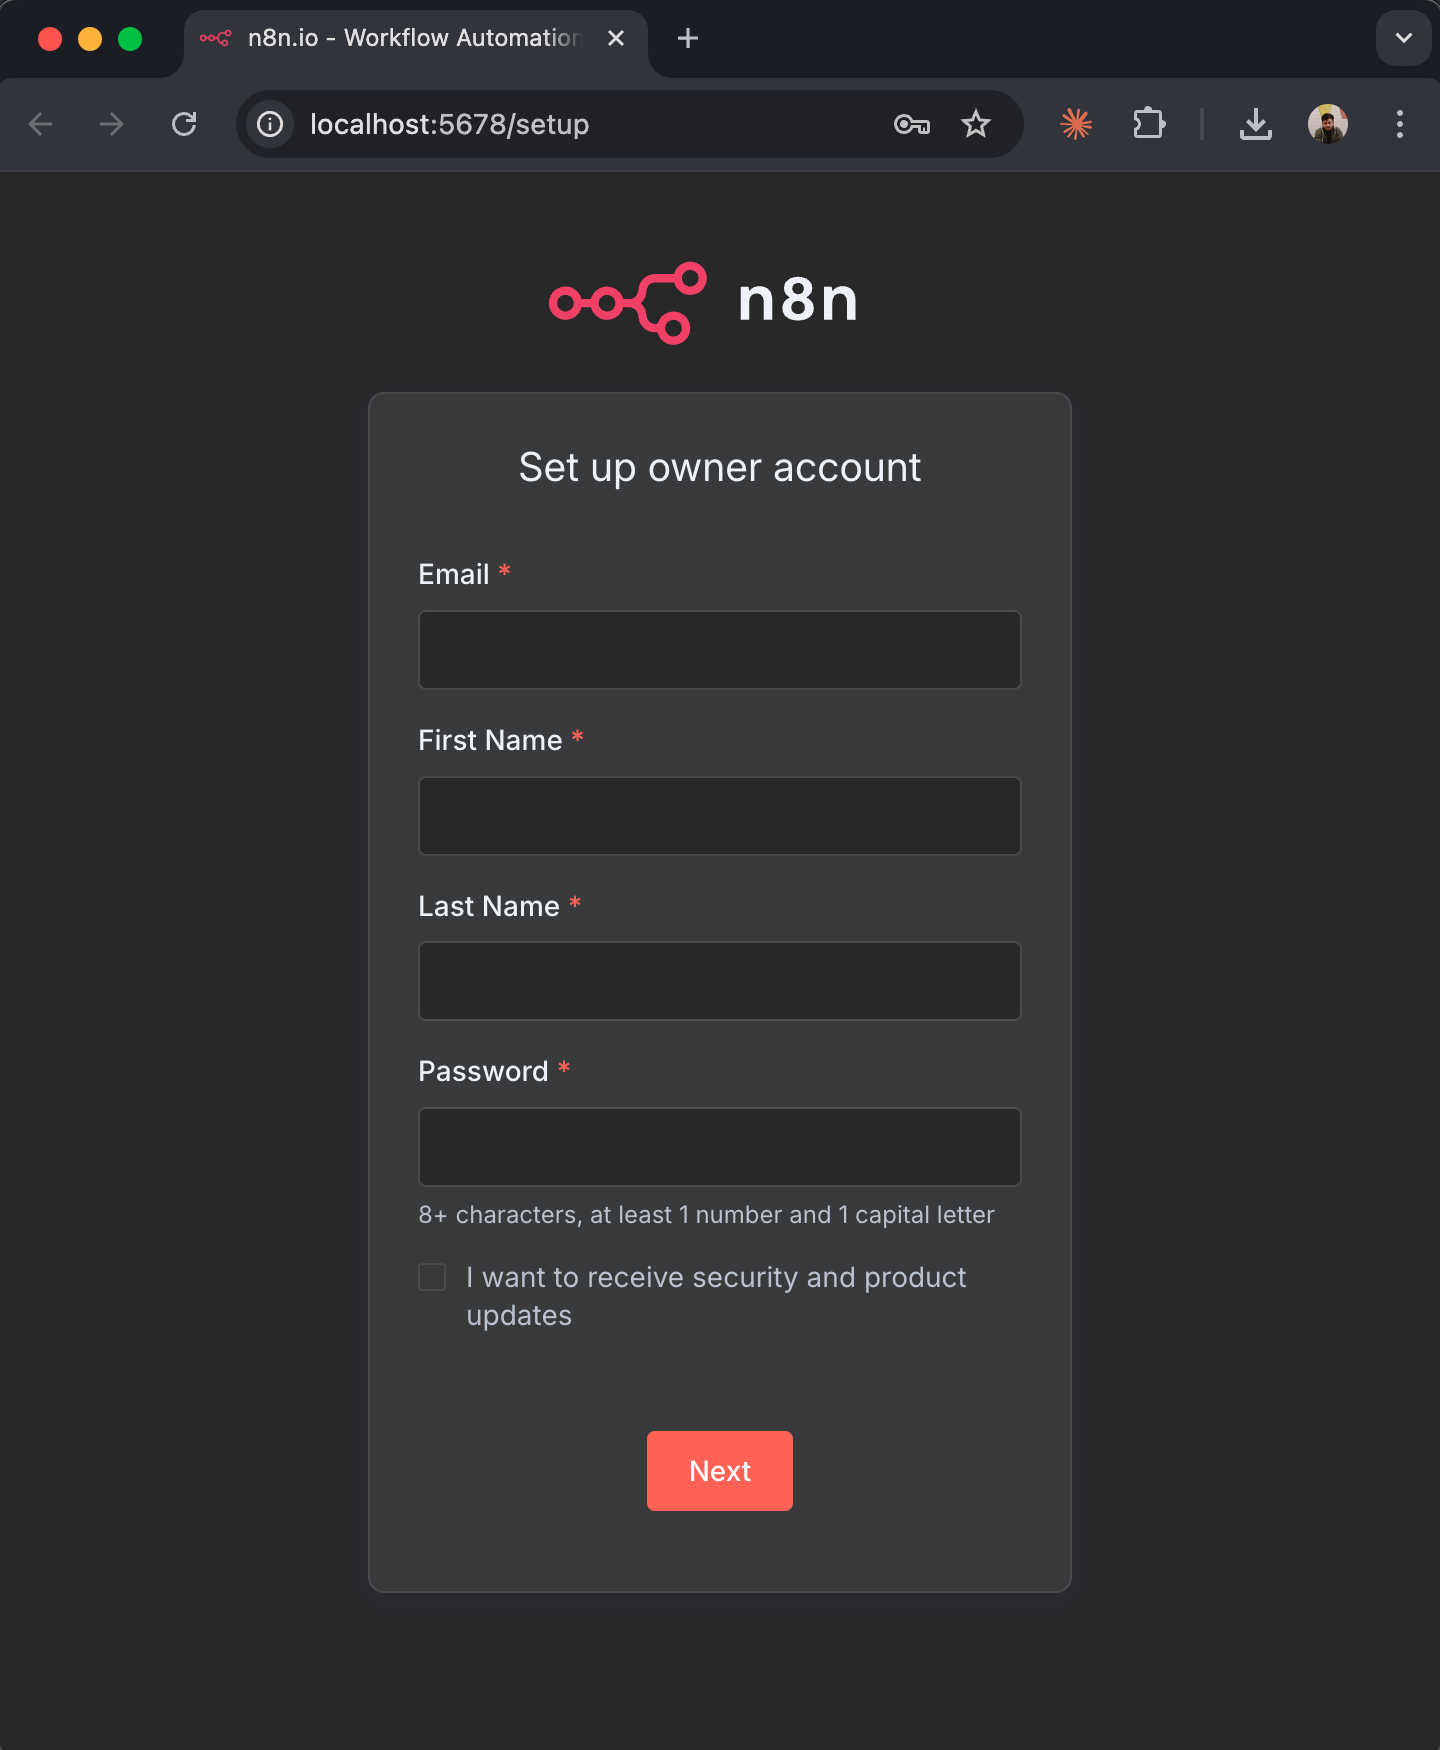 Your self-hosted n8n instance is now running locally. The interface is identical to n8n Cloud, so you can follow the rest of this guide regardless of which option you chose.
The `--rm` flag automatically removes the container when you stop it, but your data remains safe in the `n8n_data` volume. For production deployments, see the [n8n self-hosting documentation](https://docs.n8n.io/hosting/) for more advanced configuration options.
### Understanding the n8n Interface
When you first log in to n8n, you'll see the main dashboard:
Your self-hosted n8n instance is now running locally. The interface is identical to n8n Cloud, so you can follow the rest of this guide regardless of which option you chose.
The `--rm` flag automatically removes the container when you stop it, but your data remains safe in the `n8n_data` volume. For production deployments, see the [n8n self-hosting documentation](https://docs.n8n.io/hosting/) for more advanced configuration options.
### Understanding the n8n Interface
When you first log in to n8n, you'll see the main dashboard:
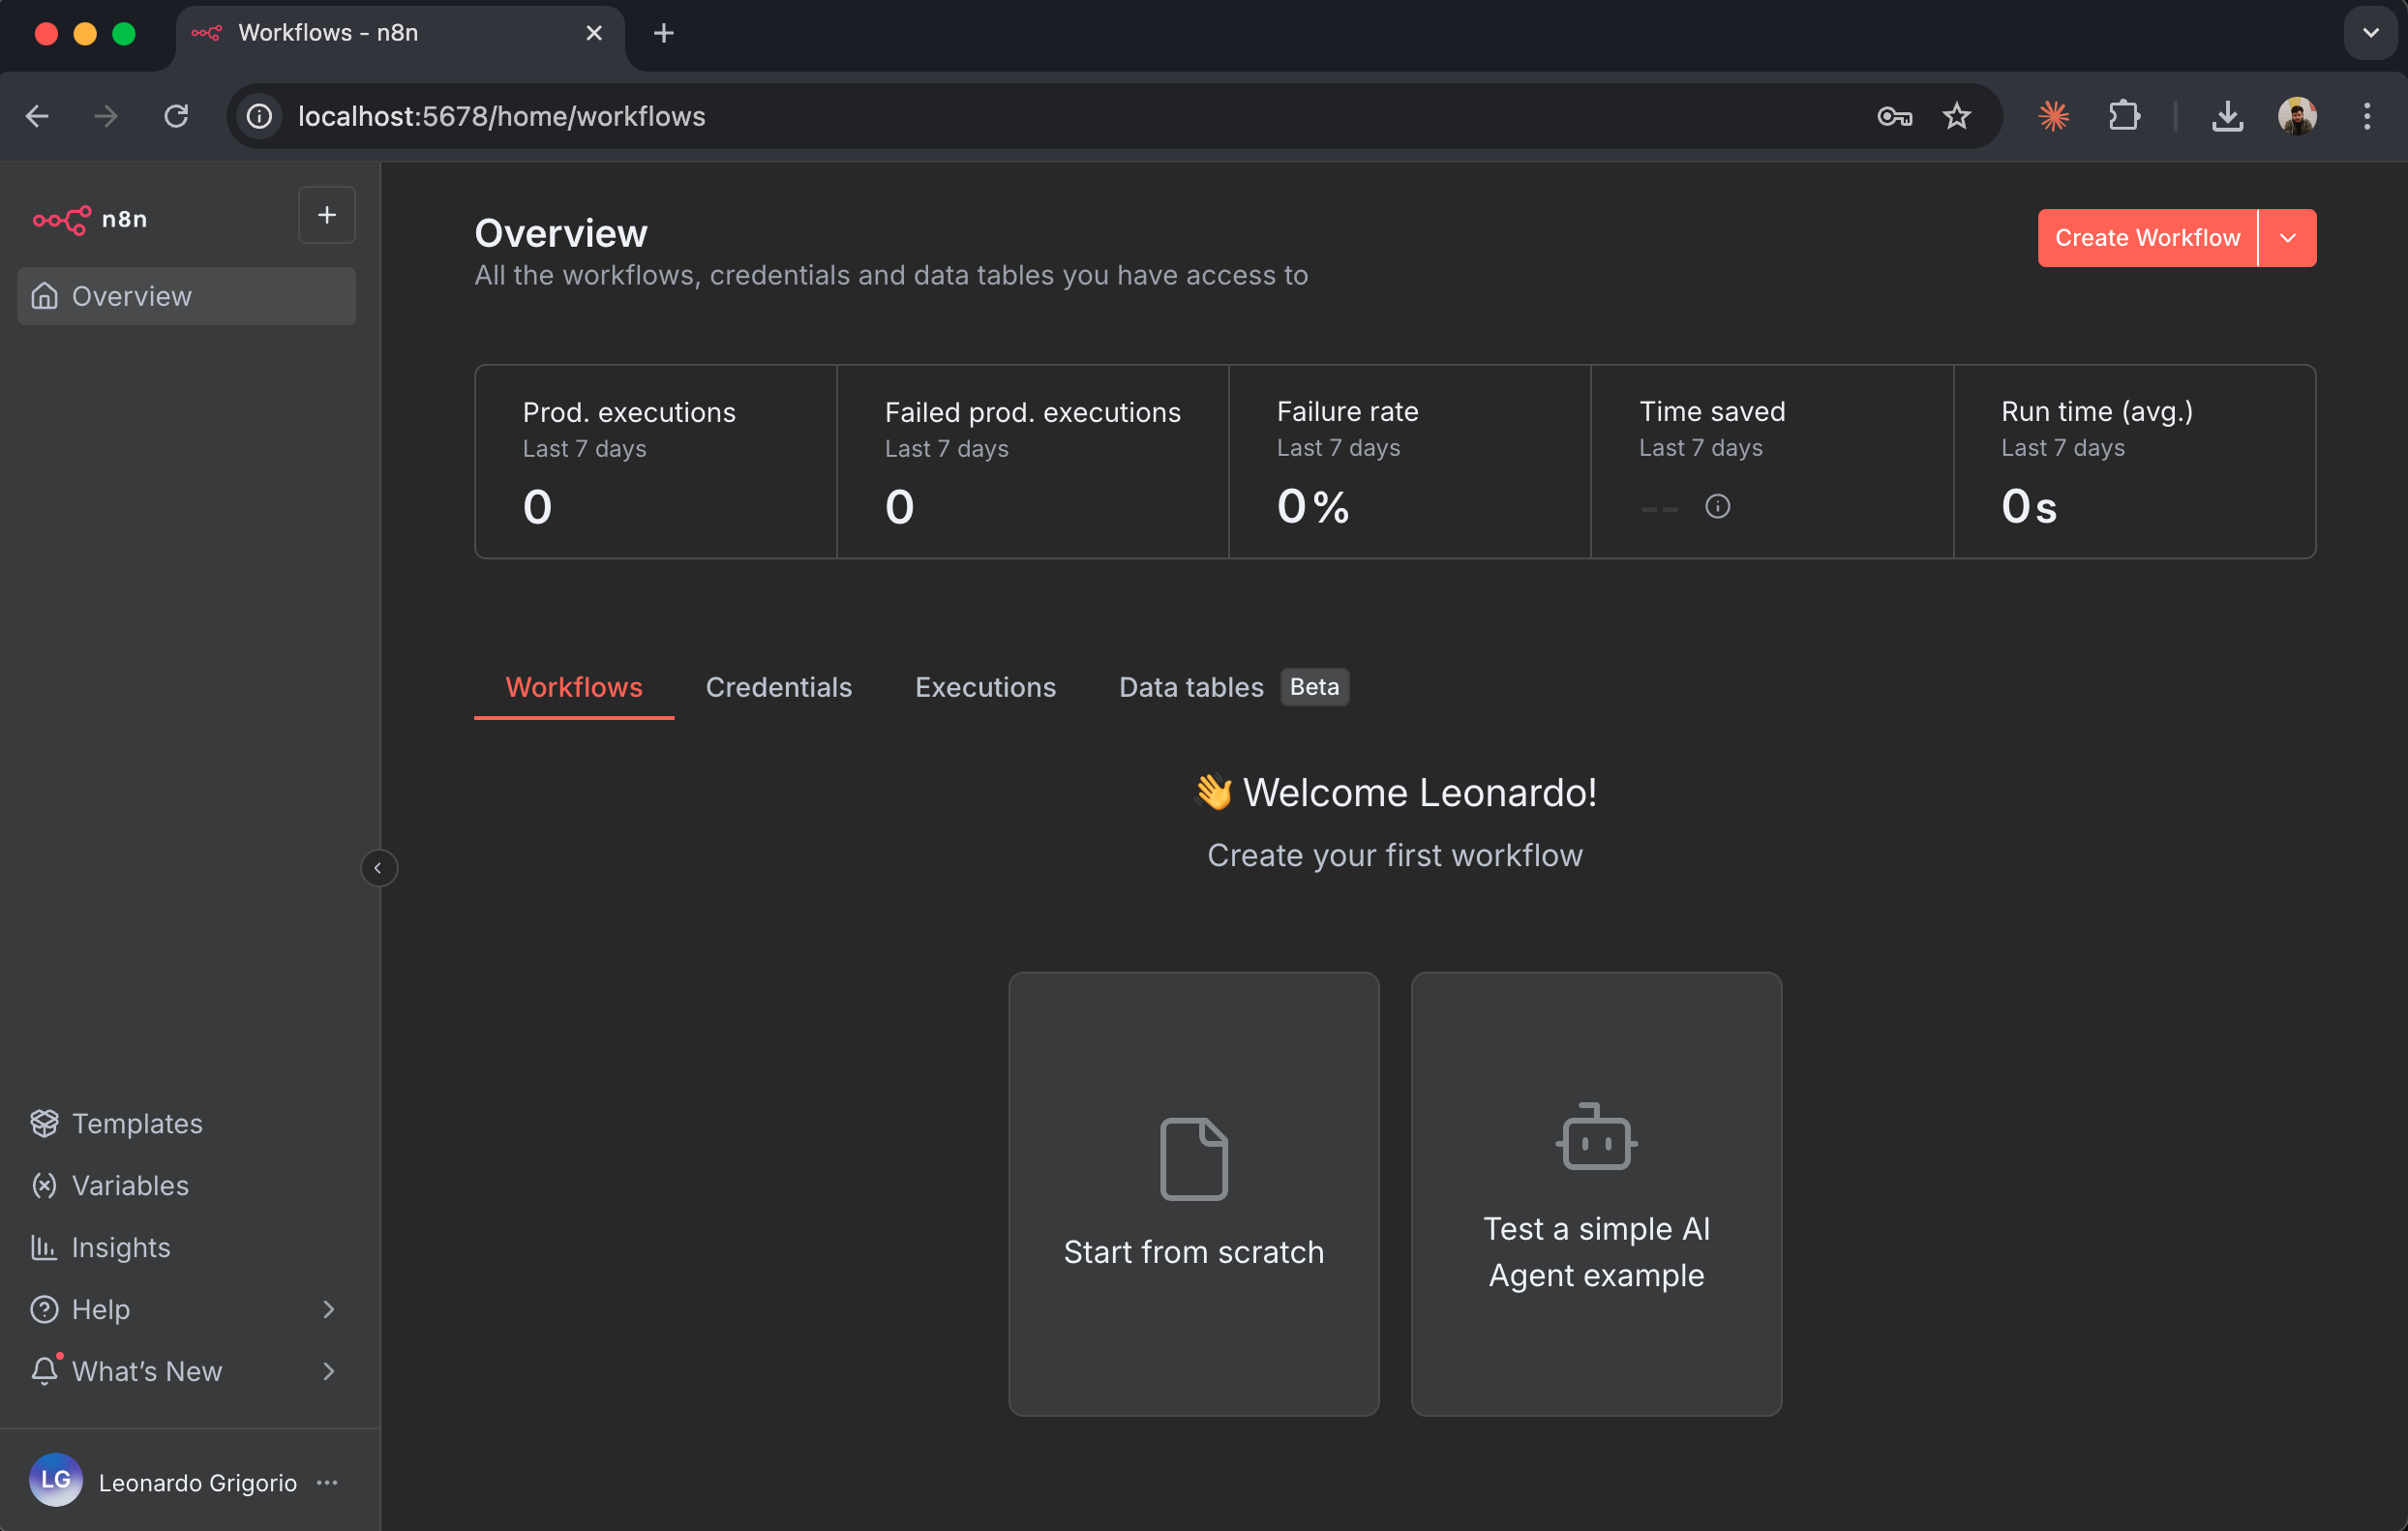 Key interface elements:
* **Workflows**: Your saved automations appear here
* **Executions**: History of workflow runs
* **Credentials**: Stored API keys and authentication tokens
* **Settings**: Account and workspace configuration
Click "Create New Workflow" to open the workflow editor.
### The Workflow Canvas
The workflow editor is where you'll build your automations:
Key interface elements:
* **Workflows**: Your saved automations appear here
* **Executions**: History of workflow runs
* **Credentials**: Stored API keys and authentication tokens
* **Settings**: Account and workspace configuration
Click "Create New Workflow" to open the workflow editor.
### The Workflow Canvas
The workflow editor is where you'll build your automations:
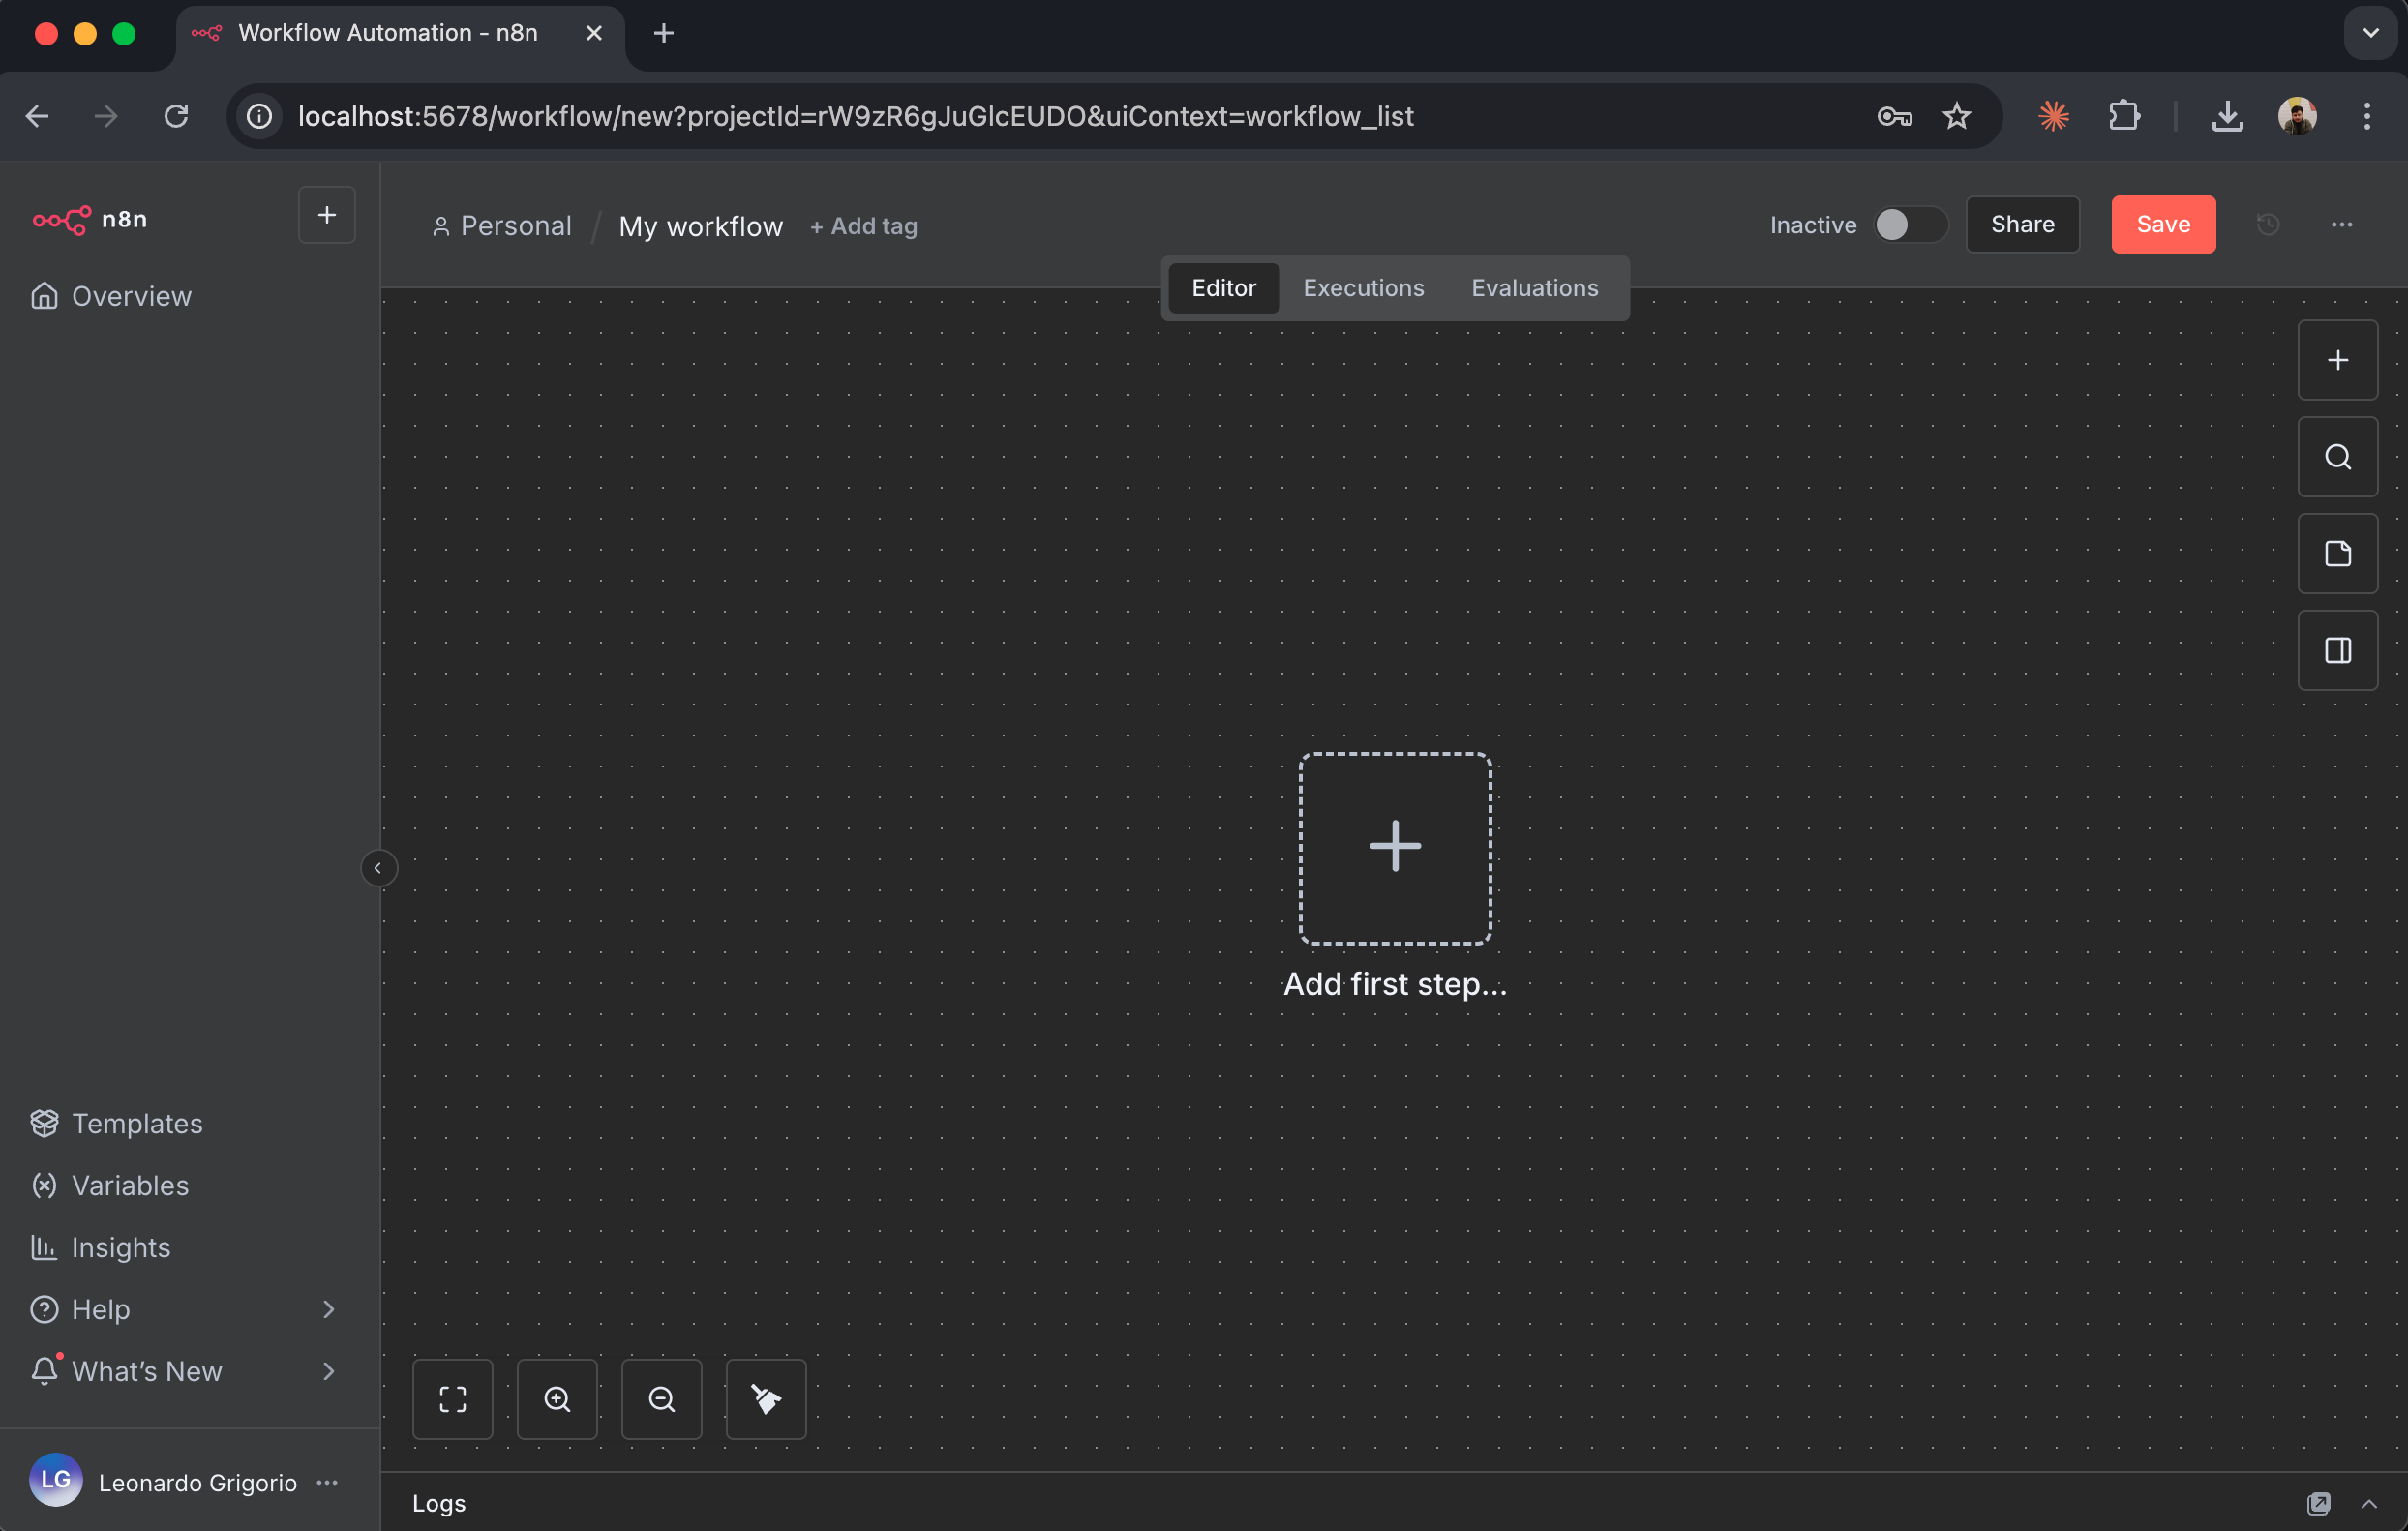 Important elements:
* **Canvas**: The main area where you place and connect nodes
* **Add Node Button (+)**: Click this to add new nodes to your workflow
* **Node Panel**: Opens when you click "+" showing all available nodes
* **Execute Workflow**: Runs your workflow manually for testing
* **Save**: Saves your workflow configuration
Let's build your first workflow by adding the Firecrawl node.
## Step 3: Install and Configure the Firecrawl Node
n8n includes native support for Firecrawl. You'll install the node and connect it to your Firecrawl account using the API key you created earlier.
### Add the Firecrawl Node to Your Workflow
1. In your new workflow canvas, click the "**+**" button in the center
2. The node selection panel opens on the right side
3. In the search box at the top, type "**Firecrawl**"
4. You'll see the Firecrawl node appear in the search results
Important elements:
* **Canvas**: The main area where you place and connect nodes
* **Add Node Button (+)**: Click this to add new nodes to your workflow
* **Node Panel**: Opens when you click "+" showing all available nodes
* **Execute Workflow**: Runs your workflow manually for testing
* **Save**: Saves your workflow configuration
Let's build your first workflow by adding the Firecrawl node.
## Step 3: Install and Configure the Firecrawl Node
n8n includes native support for Firecrawl. You'll install the node and connect it to your Firecrawl account using the API key you created earlier.
### Add the Firecrawl Node to Your Workflow
1. In your new workflow canvas, click the "**+**" button in the center
2. The node selection panel opens on the right side
3. In the search box at the top, type "**Firecrawl**"
4. You'll see the Firecrawl node appear in the search results
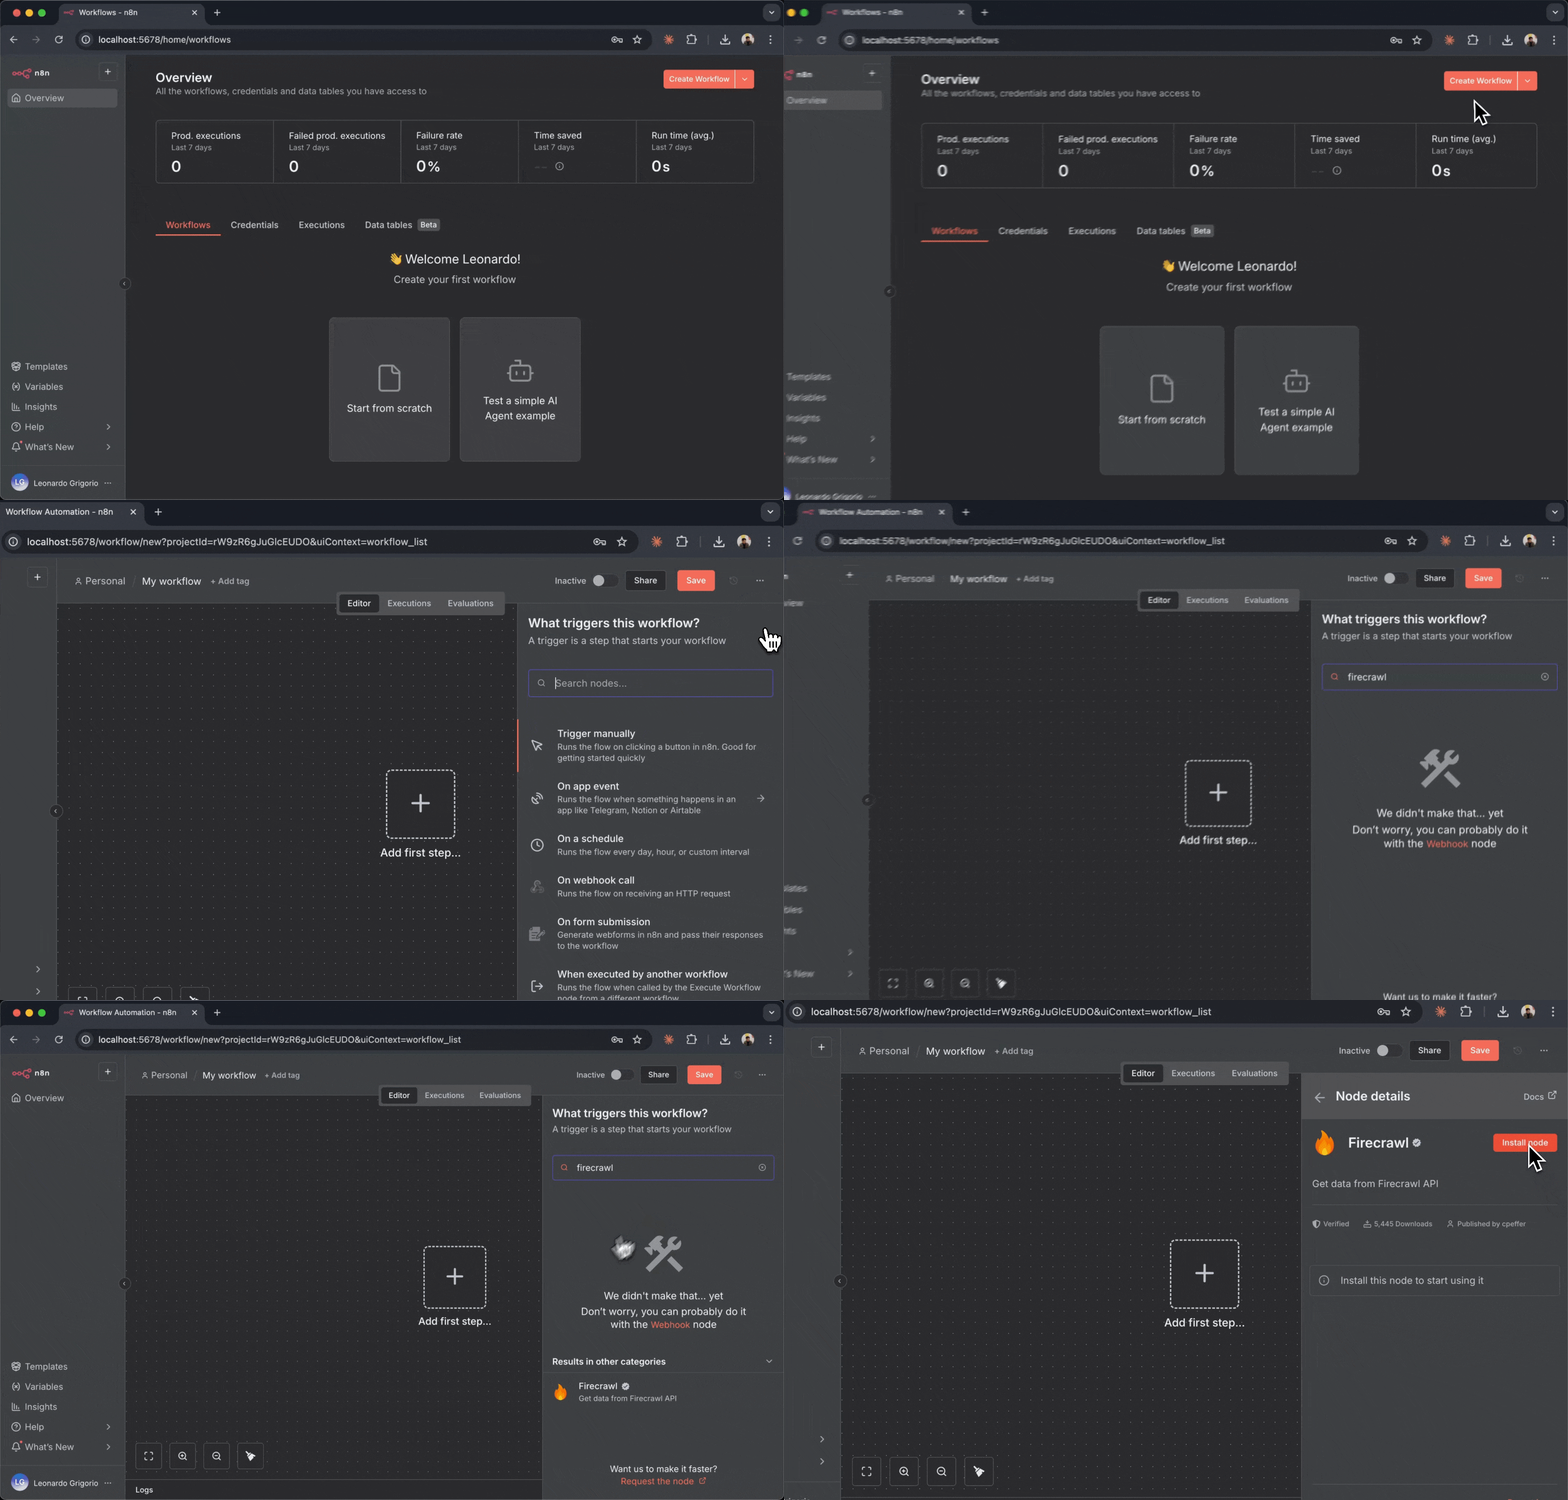 5. Click "**Install**" next to the Firecrawl node
6. Wait for the installation to complete (this takes a few seconds)
7. Once installed, click on the Firecrawl node to add it to your canvas
5. Click "**Install**" next to the Firecrawl node
6. Wait for the installation to complete (this takes a few seconds)
7. Once installed, click on the Firecrawl node to add it to your canvas
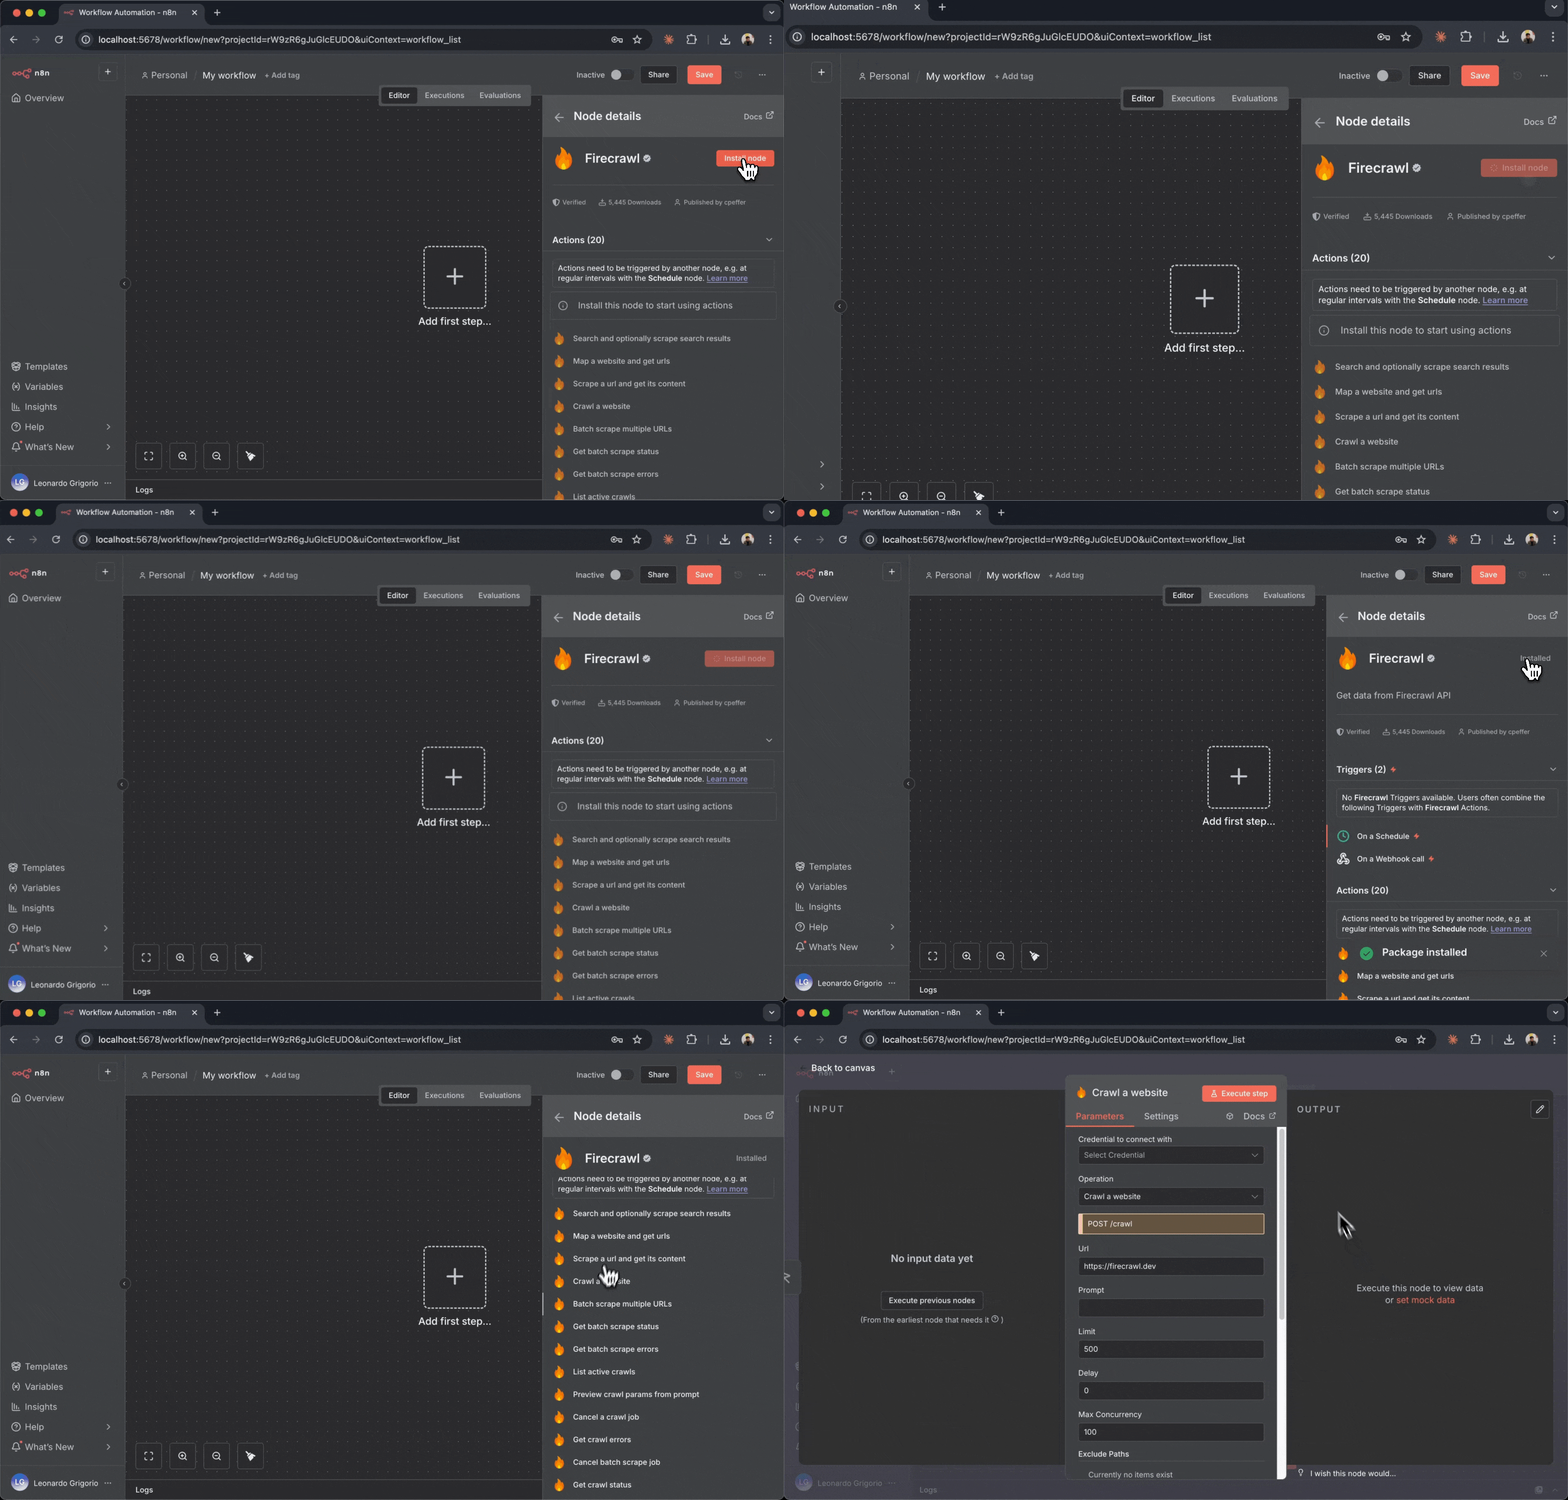 The Firecrawl node will appear on your canvas as a box with the Firecrawl logo. This node represents a single Firecrawl operation in your workflow.
### Connect Your Firecrawl API Key
**n8n Cloud users:** The launch offer that included a free Hobby plan and 100,000 credits has expired. You can still use the one-click **"Connect to Firecrawl"** OAuth button when adding the Firecrawl node. This automatically creates a new Firecrawl team linked to your n8n account and grants **10,000 free credits**. These credits do not include a Hobby plan upgrade. To view them on the [Firecrawl dashboard](https://www.firecrawl.dev/app/usage), make sure you switch to your n8n-linked team using the team selector in the top-left corner.
Before you can use the Firecrawl node, you need to authenticate it with your API key:
1. Click on the Firecrawl node box to open its configuration panel on the right
2. At the top, you'll see a "Credential to connect with" dropdown
3. Since this is your first time, click "**Create New Credential**"
The Firecrawl node will appear on your canvas as a box with the Firecrawl logo. This node represents a single Firecrawl operation in your workflow.
### Connect Your Firecrawl API Key
**n8n Cloud users:** The launch offer that included a free Hobby plan and 100,000 credits has expired. You can still use the one-click **"Connect to Firecrawl"** OAuth button when adding the Firecrawl node. This automatically creates a new Firecrawl team linked to your n8n account and grants **10,000 free credits**. These credits do not include a Hobby plan upgrade. To view them on the [Firecrawl dashboard](https://www.firecrawl.dev/app/usage), make sure you switch to your n8n-linked team using the team selector in the top-left corner.
Before you can use the Firecrawl node, you need to authenticate it with your API key:
1. Click on the Firecrawl node box to open its configuration panel on the right
2. At the top, you'll see a "Credential to connect with" dropdown
3. Since this is your first time, click "**Create New Credential**"
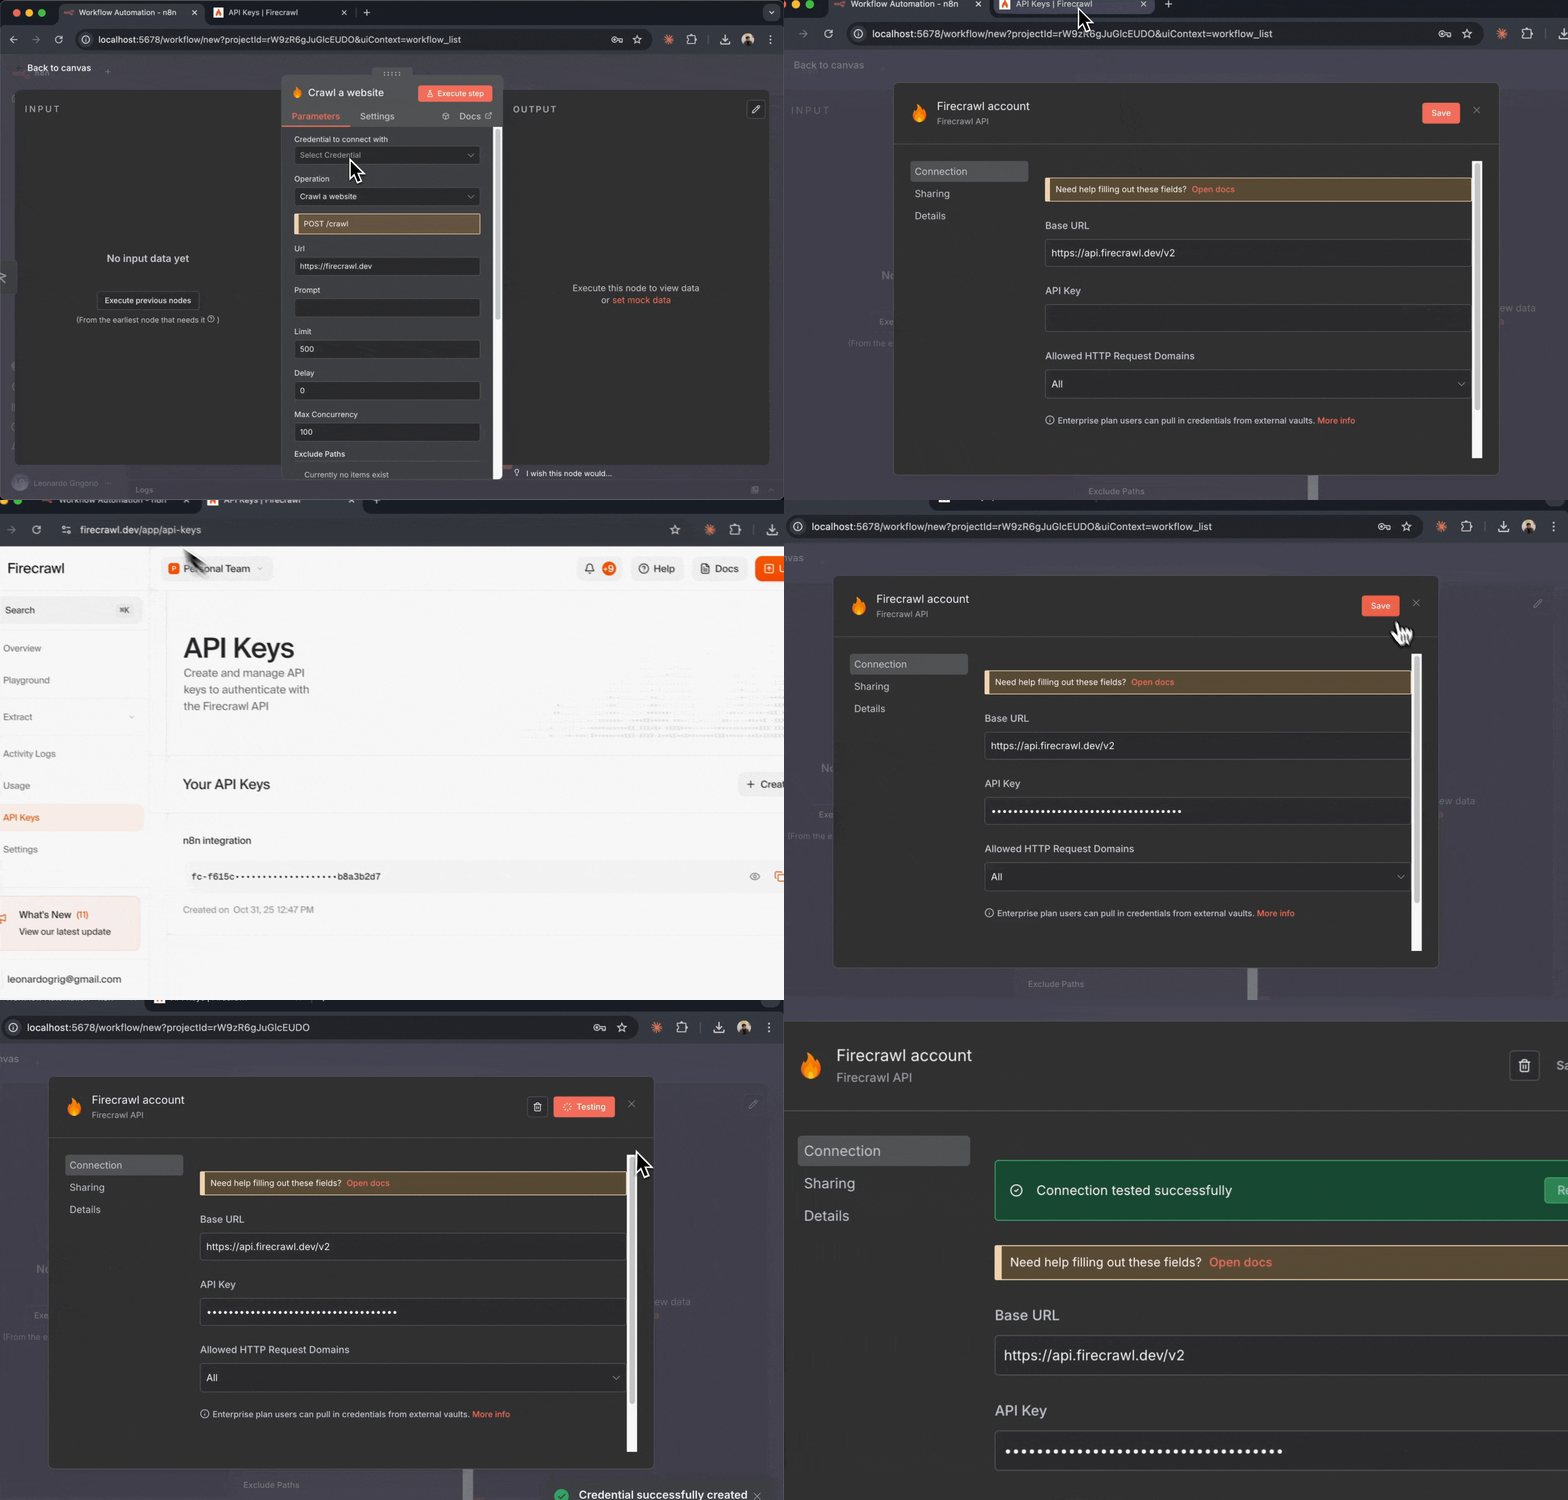 4. A credential configuration window opens
5. Enter a name for this credential (e.g., "My Firecrawl Account")
6. Paste your Firecrawl API key in the "API Key" field
7. Click "**Save**" at the bottom
The credential is now saved in n8n. You won't need to enter your API key again for future Firecrawl nodes.
### Test Your Connection
Let's verify that your Firecrawl node is properly connected:
1. With the Firecrawl node still selected, look at the configuration panel
2. In the "Resource" dropdown, select "**Scrape a url and get its content**"
3. In the "URL" field, enter: `https://firecrawl.dev`
4. Leave other settings at their defaults for now
5. Click the "**Test step**" button at the bottom right of the node
4. A credential configuration window opens
5. Enter a name for this credential (e.g., "My Firecrawl Account")
6. Paste your Firecrawl API key in the "API Key" field
7. Click "**Save**" at the bottom
The credential is now saved in n8n. You won't need to enter your API key again for future Firecrawl nodes.
### Test Your Connection
Let's verify that your Firecrawl node is properly connected:
1. With the Firecrawl node still selected, look at the configuration panel
2. In the "Resource" dropdown, select "**Scrape a url and get its content**"
3. In the "URL" field, enter: `https://firecrawl.dev`
4. Leave other settings at their defaults for now
5. Click the "**Test step**" button at the bottom right of the node
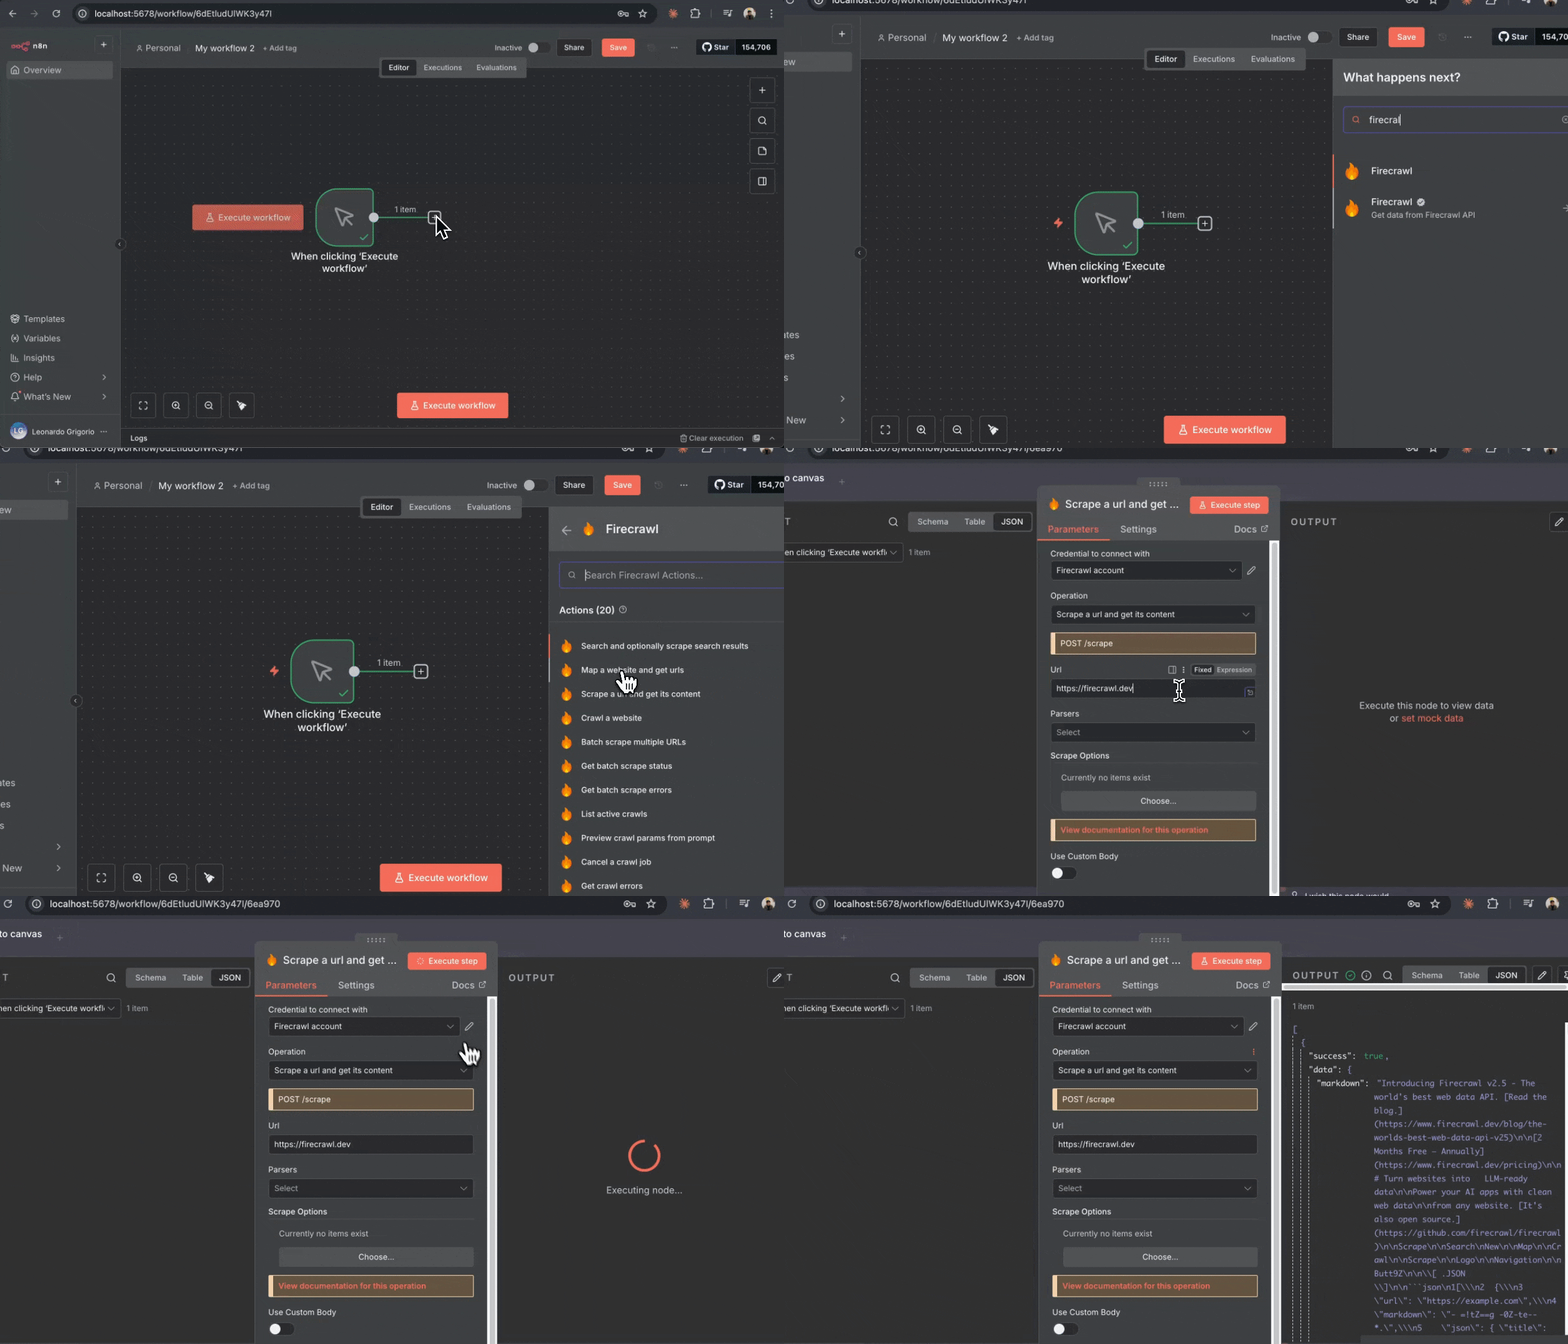 If everything is configured correctly, you'll see the scraped content from example.com appear in the output panel below the node.
Congratulations! Your Firecrawl node is now connected and working.
## Step 4: Create Your Telegram Bot
Before building your first workflow, you'll need a Telegram bot to receive notifications. Telegram bots are free and easy to create through Telegram's BotFather.
### Create a Bot with BotFather
1. Open Telegram on your phone or desktop
2. Search for "**@BotFather**" (the official bot from Telegram)
3. Start a conversation with BotFather by clicking "**Start**"
4. Send the command `/newbot` to create a new bot
5. BotFather will ask you to choose a name for your bot (this is the display name users will see)
6. Enter a name like "**My Firecrawl Bot**"
7. Next, choose a username for your bot. It must end with "bot" (e.g., "**my\_firecrawl\_updates\_bot**")
8. If the username is available, BotFather will create your bot and send you a message with your bot token
If everything is configured correctly, you'll see the scraped content from example.com appear in the output panel below the node.
Congratulations! Your Firecrawl node is now connected and working.
## Step 4: Create Your Telegram Bot
Before building your first workflow, you'll need a Telegram bot to receive notifications. Telegram bots are free and easy to create through Telegram's BotFather.
### Create a Bot with BotFather
1. Open Telegram on your phone or desktop
2. Search for "**@BotFather**" (the official bot from Telegram)
3. Start a conversation with BotFather by clicking "**Start**"
4. Send the command `/newbot` to create a new bot
5. BotFather will ask you to choose a name for your bot (this is the display name users will see)
6. Enter a name like "**My Firecrawl Bot**"
7. Next, choose a username for your bot. It must end with "bot" (e.g., "**my\_firecrawl\_updates\_bot**")
8. If the username is available, BotFather will create your bot and send you a message with your bot token
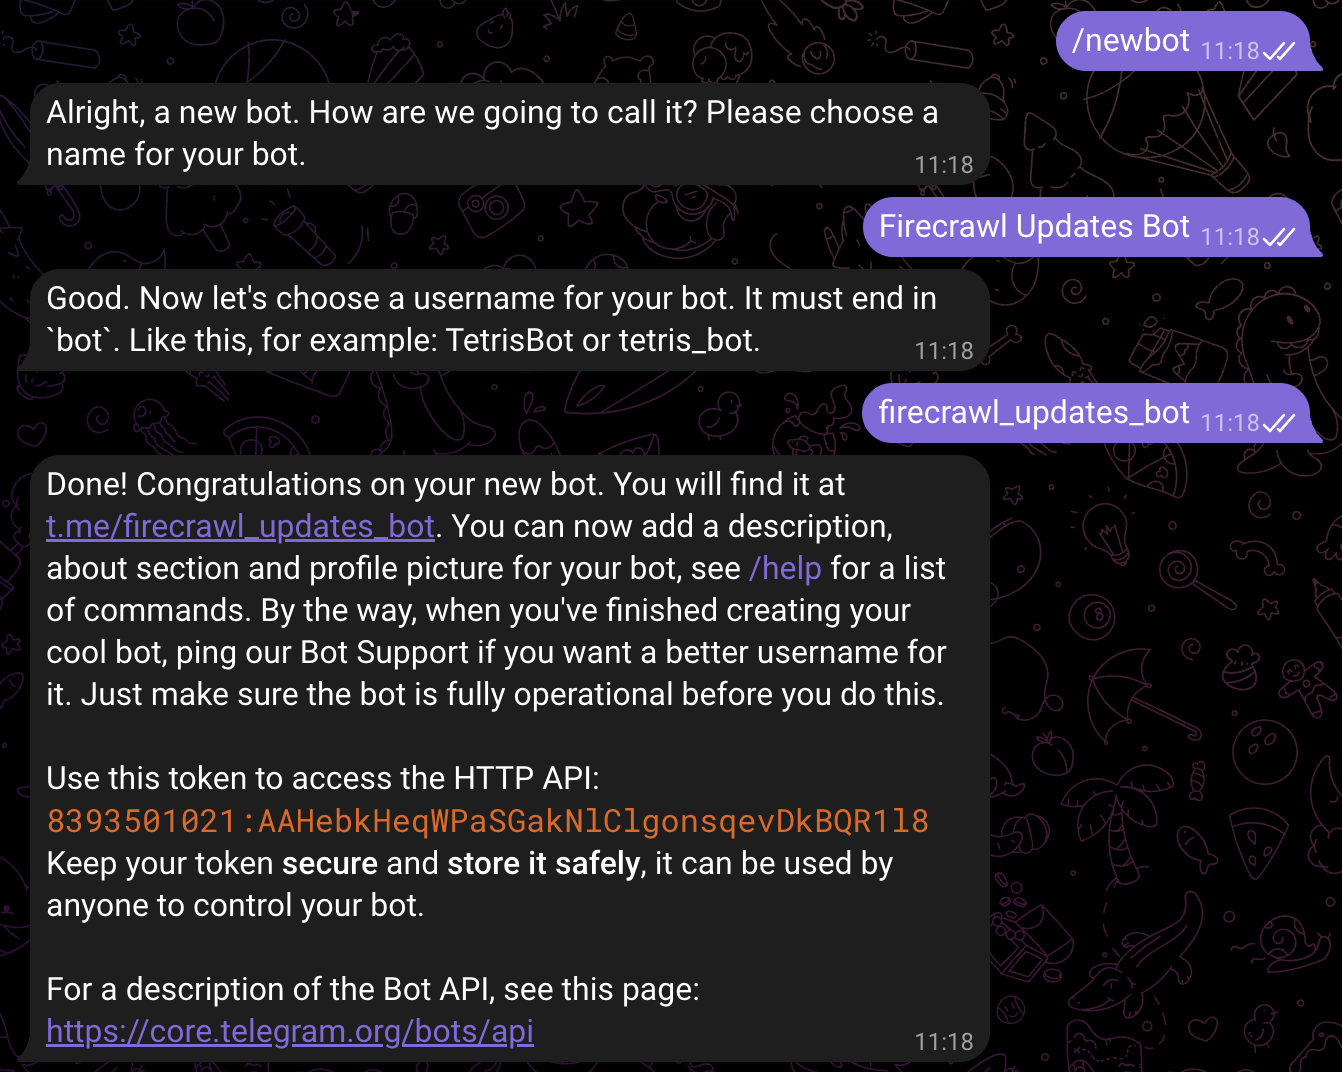 Save your bot token securely. This token is like a password that allows n8n to send messages as your bot. Never share it publicly.
### Get Your Chat ID
To send messages to yourself, you need your Telegram chat ID:
1. Open your web browser and visit this URL (replace `YOUR_BOT_TOKEN` with your actual bot token):
```
https://api.telegram.org/botYOUR_BOT_TOKEN/getUpdates
```
2. Keep this browser tab open
3. Now, search for your bot's username in Telegram (the one you just created)
4. Start a conversation with your bot by clicking "**Start**"
5. Send any message to your bot (e.g., "hello")
6. Go back to the browser tab and refresh the page
7. Look for the `"chat":{"id":` field in the JSON response
8. The number next to `"id":` is your chat ID (e.g., `123456789`)
9. Save this chat ID for later
Save your bot token securely. This token is like a password that allows n8n to send messages as your bot. Never share it publicly.
### Get Your Chat ID
To send messages to yourself, you need your Telegram chat ID:
1. Open your web browser and visit this URL (replace `YOUR_BOT_TOKEN` with your actual bot token):
```
https://api.telegram.org/botYOUR_BOT_TOKEN/getUpdates
```
2. Keep this browser tab open
3. Now, search for your bot's username in Telegram (the one you just created)
4. Start a conversation with your bot by clicking "**Start**"
5. Send any message to your bot (e.g., "hello")
6. Go back to the browser tab and refresh the page
7. Look for the `"chat":{"id":` field in the JSON response
8. The number next to `"id":` is your chat ID (e.g., `123456789`)
9. Save this chat ID for later
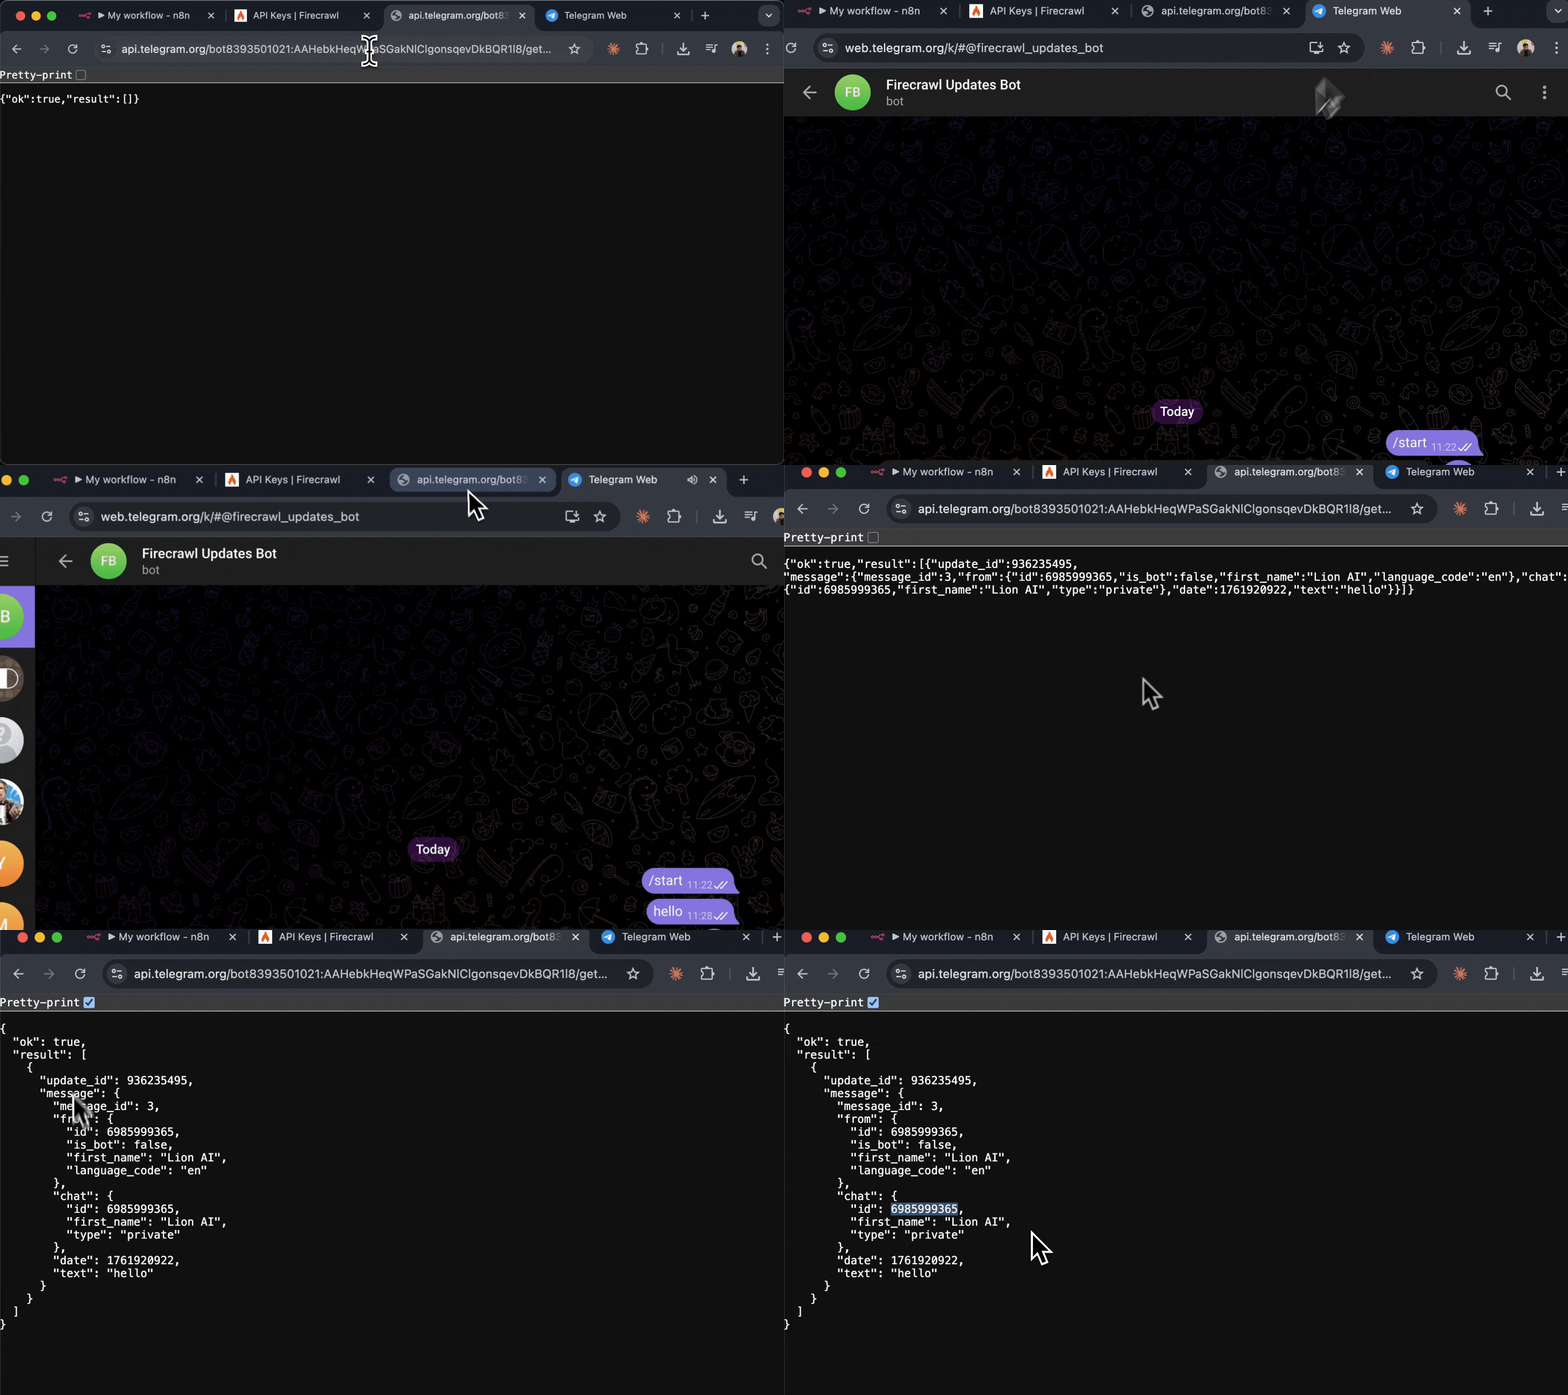 Your chat ID is the unique identifier for your conversation with the bot. You'll use this to tell n8n where to send messages.
You now have everything needed to integrate Telegram with your n8n workflows.
## Step 5: Build Practical Workflows with Telegram
Now let's build three real-world workflows that send information directly to your Telegram. These examples demonstrate different Firecrawl operations and how to integrate them with Telegram notifications.
### Example 1: Daily Firecrawl Product Updates Summary
Get a daily summary of Firecrawl product updates delivered to your Telegram every morning.
**What you'll build:**
* Scrapes Firecrawl's product updates blog at 9 AM daily
* Uses AI to generate a summary of the content
* Sends the summary to your Telegram
**Step-by-step:**
1. Create a new workflow in n8n
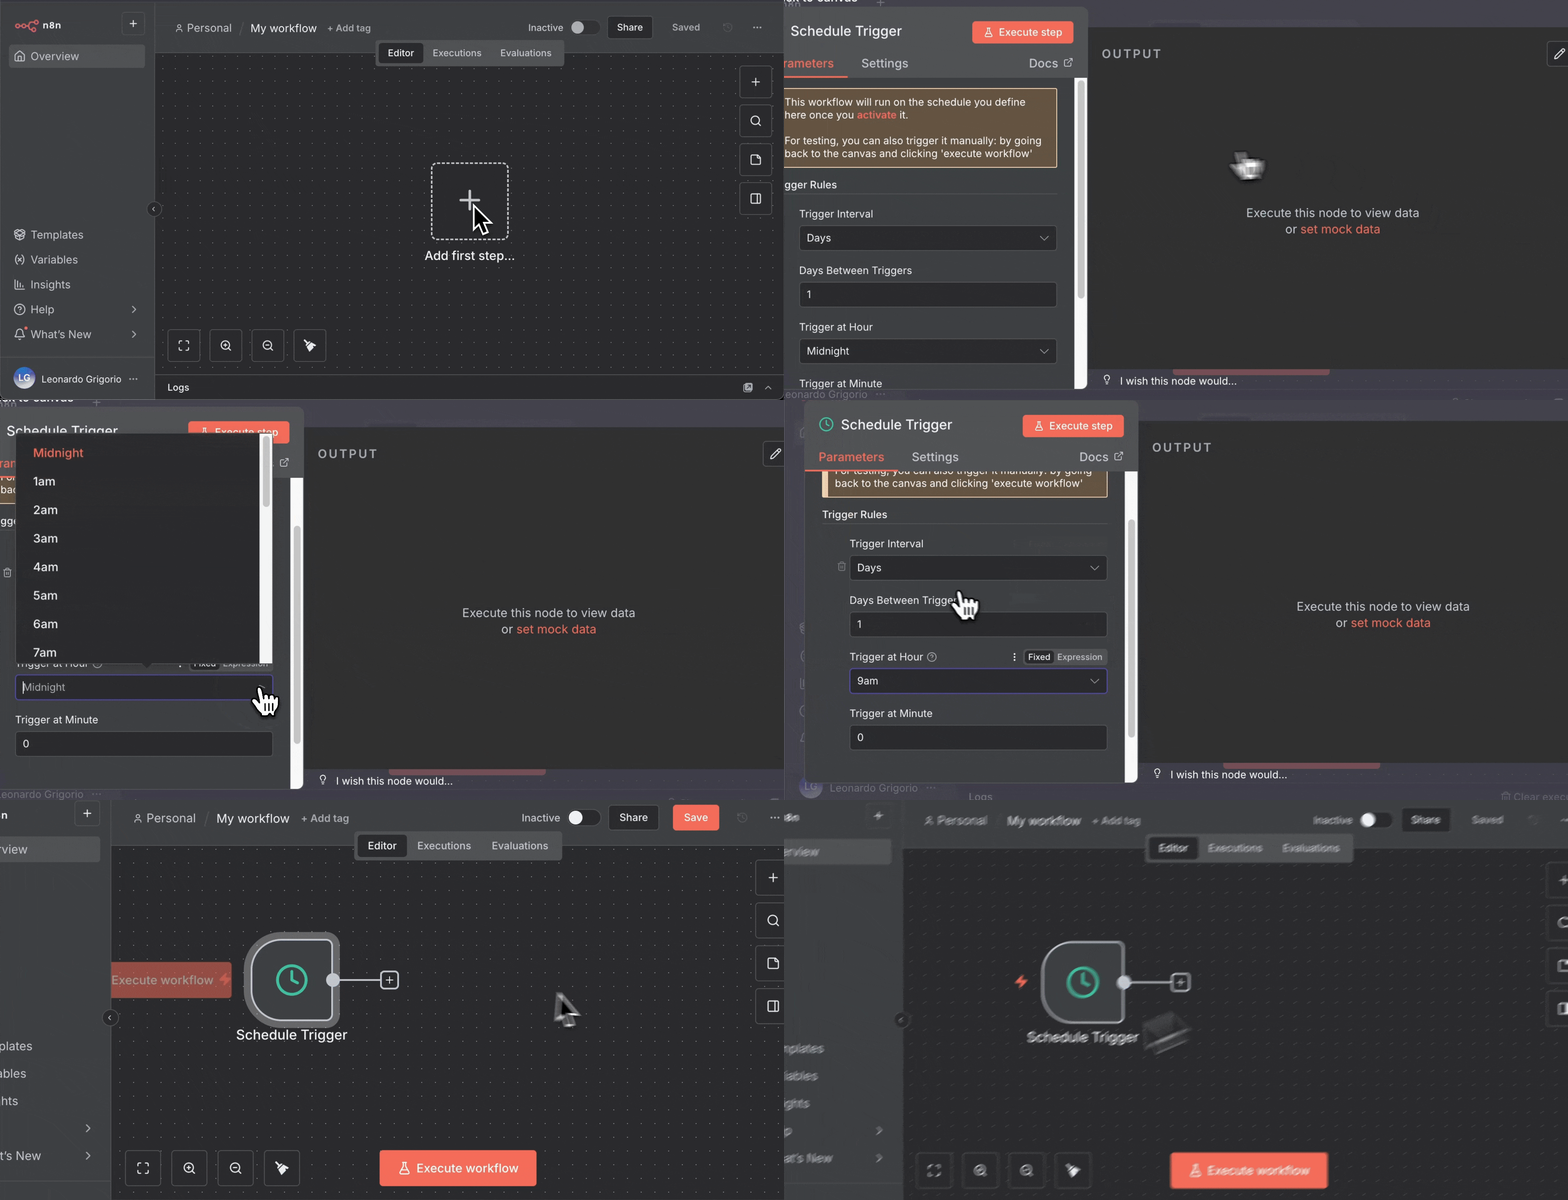
2. Add a **Schedule Trigger** node:
* Click the "**+**" button on canvas
* Search for "**Schedule Trigger**"
* Configure: Every day at 9:00 AM
Your chat ID is the unique identifier for your conversation with the bot. You'll use this to tell n8n where to send messages.
You now have everything needed to integrate Telegram with your n8n workflows.
## Step 5: Build Practical Workflows with Telegram
Now let's build three real-world workflows that send information directly to your Telegram. These examples demonstrate different Firecrawl operations and how to integrate them with Telegram notifications.
### Example 1: Daily Firecrawl Product Updates Summary
Get a daily summary of Firecrawl product updates delivered to your Telegram every morning.
**What you'll build:**
* Scrapes Firecrawl's product updates blog at 9 AM daily
* Uses AI to generate a summary of the content
* Sends the summary to your Telegram
**Step-by-step:**
1. Create a new workflow in n8n
2. Add a **Schedule Trigger** node:
* Click the "**+**" button on canvas
* Search for "**Schedule Trigger**"
* Configure: Every day at 9:00 AM
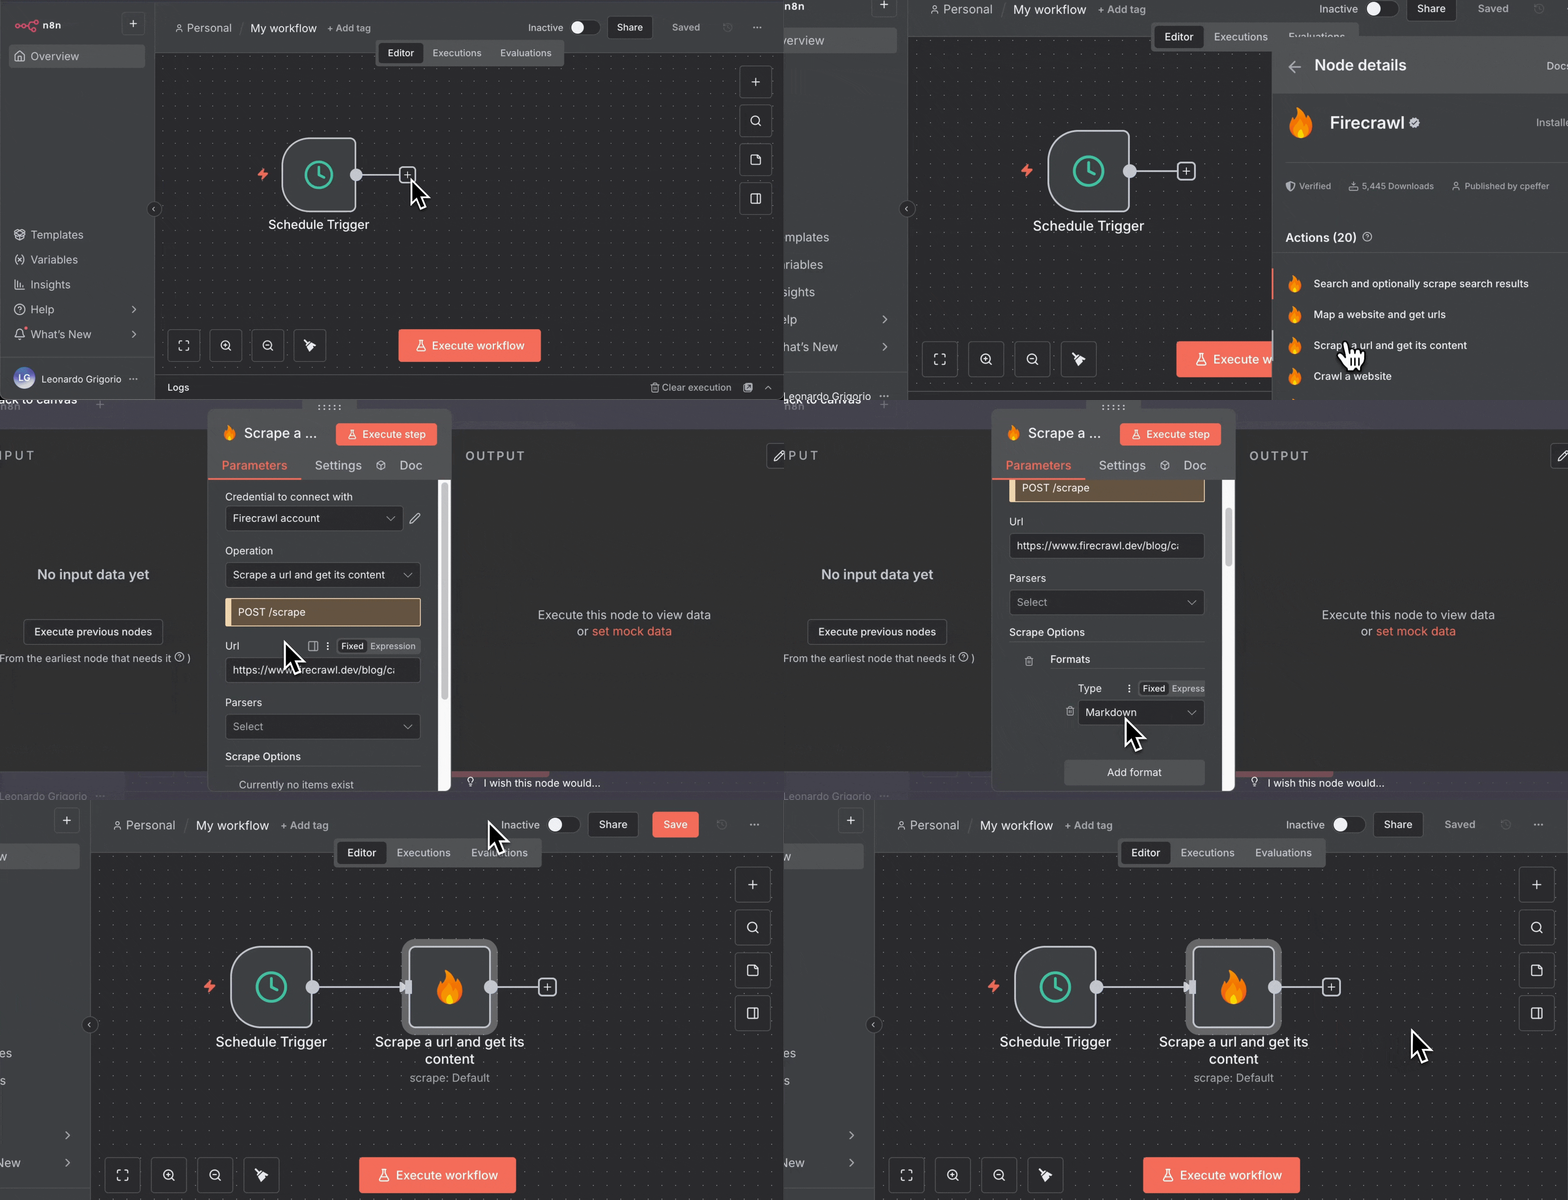
 3. Add the **Firecrawl** node:
* Click "**+**" next to Schedule Trigger
* Search for and add "**Firecrawl**"
* Select your Firecrawl credential
* Configure:
* **Resource**: Scrape a url and get its content
* **URL**: `https://www.firecrawl.dev/blog/category/product-updates`
* **Formats**: Select "Summary"
3. Add the **Firecrawl** node:
* Click "**+**" next to Schedule Trigger
* Search for and add "**Firecrawl**"
* Select your Firecrawl credential
* Configure:
* **Resource**: Scrape a url and get its content
* **URL**: `https://www.firecrawl.dev/blog/category/product-updates`
* **Formats**: Select "Summary"
 4. Add the **Telegram** node:
* Click "**+**" next to Firecrawl
* Search for "**Telegram**"
* Click "**Send a text message**" to add it to the canvas
5. Set up Telegram credentials:
* Click on the Telegram node to open its configuration
* In the "Credential to connect with" dropdown, click "**Create New Credential**"
* Paste your bot token from BotFather
* Click "**Save**"
4. Add the **Telegram** node:
* Click "**+**" next to Firecrawl
* Search for "**Telegram**"
* Click "**Send a text message**" to add it to the canvas
5. Set up Telegram credentials:
* Click on the Telegram node to open its configuration
* In the "Credential to connect with" dropdown, click "**Create New Credential**"
* Paste your bot token from BotFather
* Click "**Save**"
 6. Configure the Telegram message:
* **Operation**: Send Message
* **Chat ID**: Enter your chat ID
* **Text**: Leave this with a "hello" message for now
* Click **Execute step** to test sending a message while receiving the summary from Firecrawl.
6. Configure the Telegram message:
* **Operation**: Send Message
* **Chat ID**: Enter your chat ID
* **Text**: Leave this with a "hello" message for now
* Click **Execute step** to test sending a message while receiving the summary from Firecrawl.
 * Now with Firecrawl's summary structure, add the summary to the message text by dragging the `summary` field from Firecrawl node output.
7. Test the workflow:
* Click "**Execute Workflow**"
* Check your Telegram for the summary message
* Now with Firecrawl's summary structure, add the summary to the message text by dragging the `summary` field from Firecrawl node output.
7. Test the workflow:
* Click "**Execute Workflow**"
* Check your Telegram for the summary message
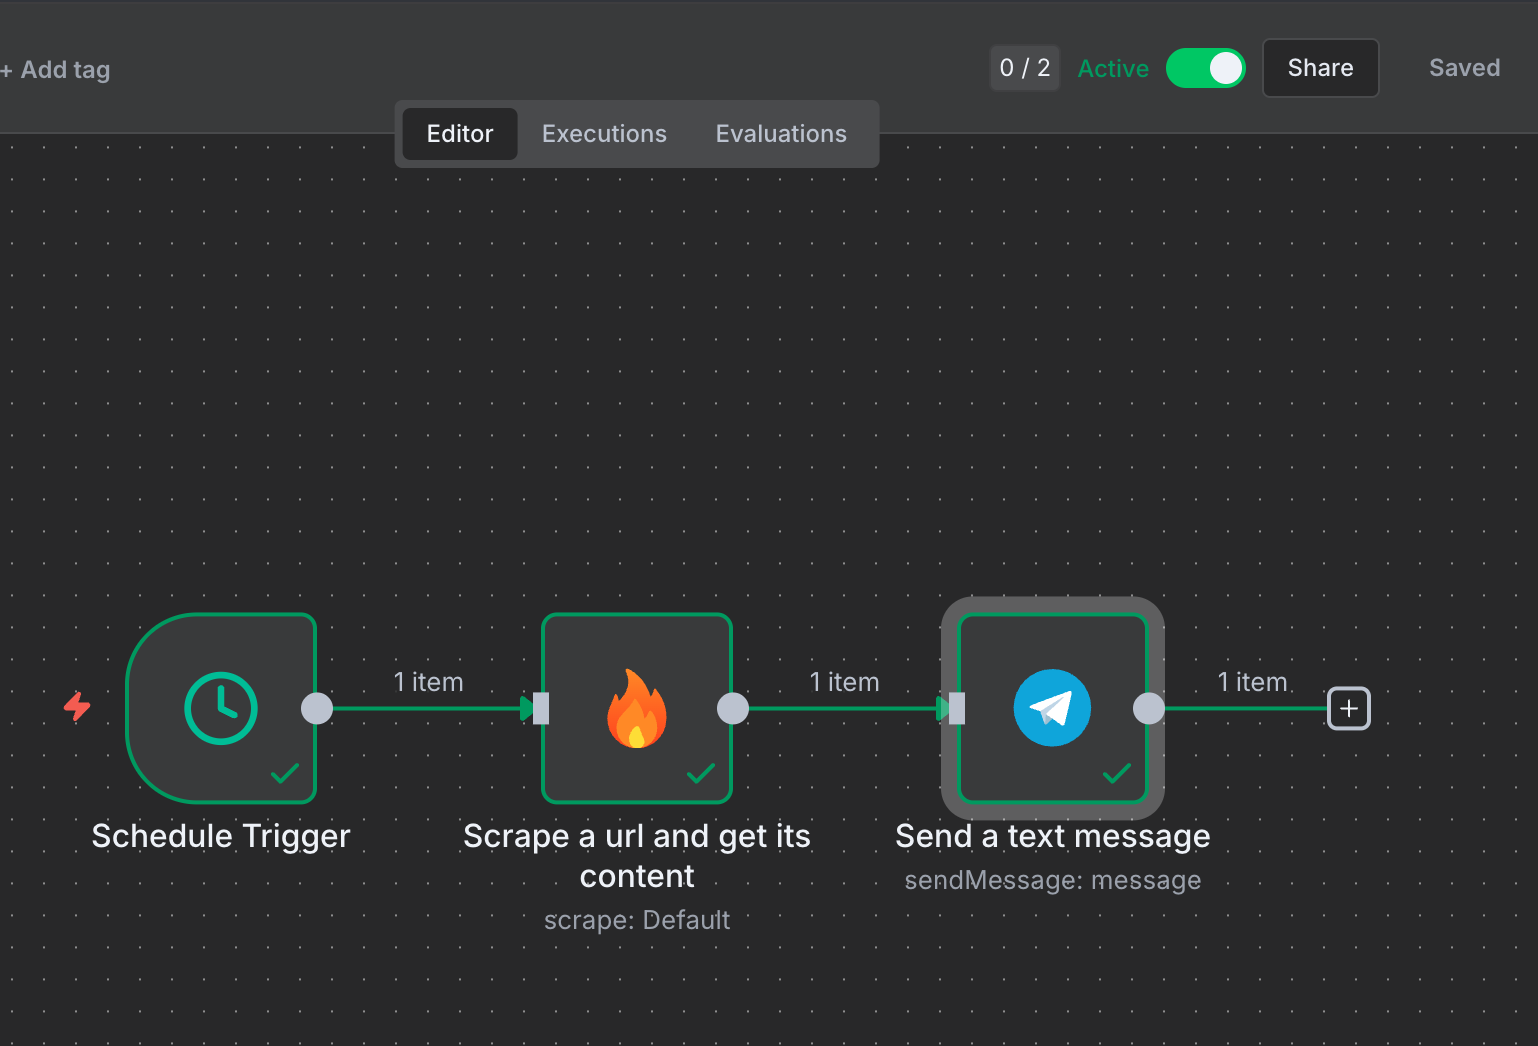 8. Activate the workflow by toggling the "**Active**" switch
Your Telegram bot will now send you a daily summary of Firecrawl product updates every morning at 9 AM.
### Example 2: AI News Search to Telegram
This workflow uses Firecrawl's Search operation to find AI news and send formatted results to Telegram.
**Key differences from Example 1:**
* Uses a **Manual Trigger** instead of Schedule (run on demand)
* Uses **Search** operation instead of Scrape
* Includes a **Code** node to format multiple results
**Build the workflow:**
1. Create a new workflow and add a **Manual Trigger** node
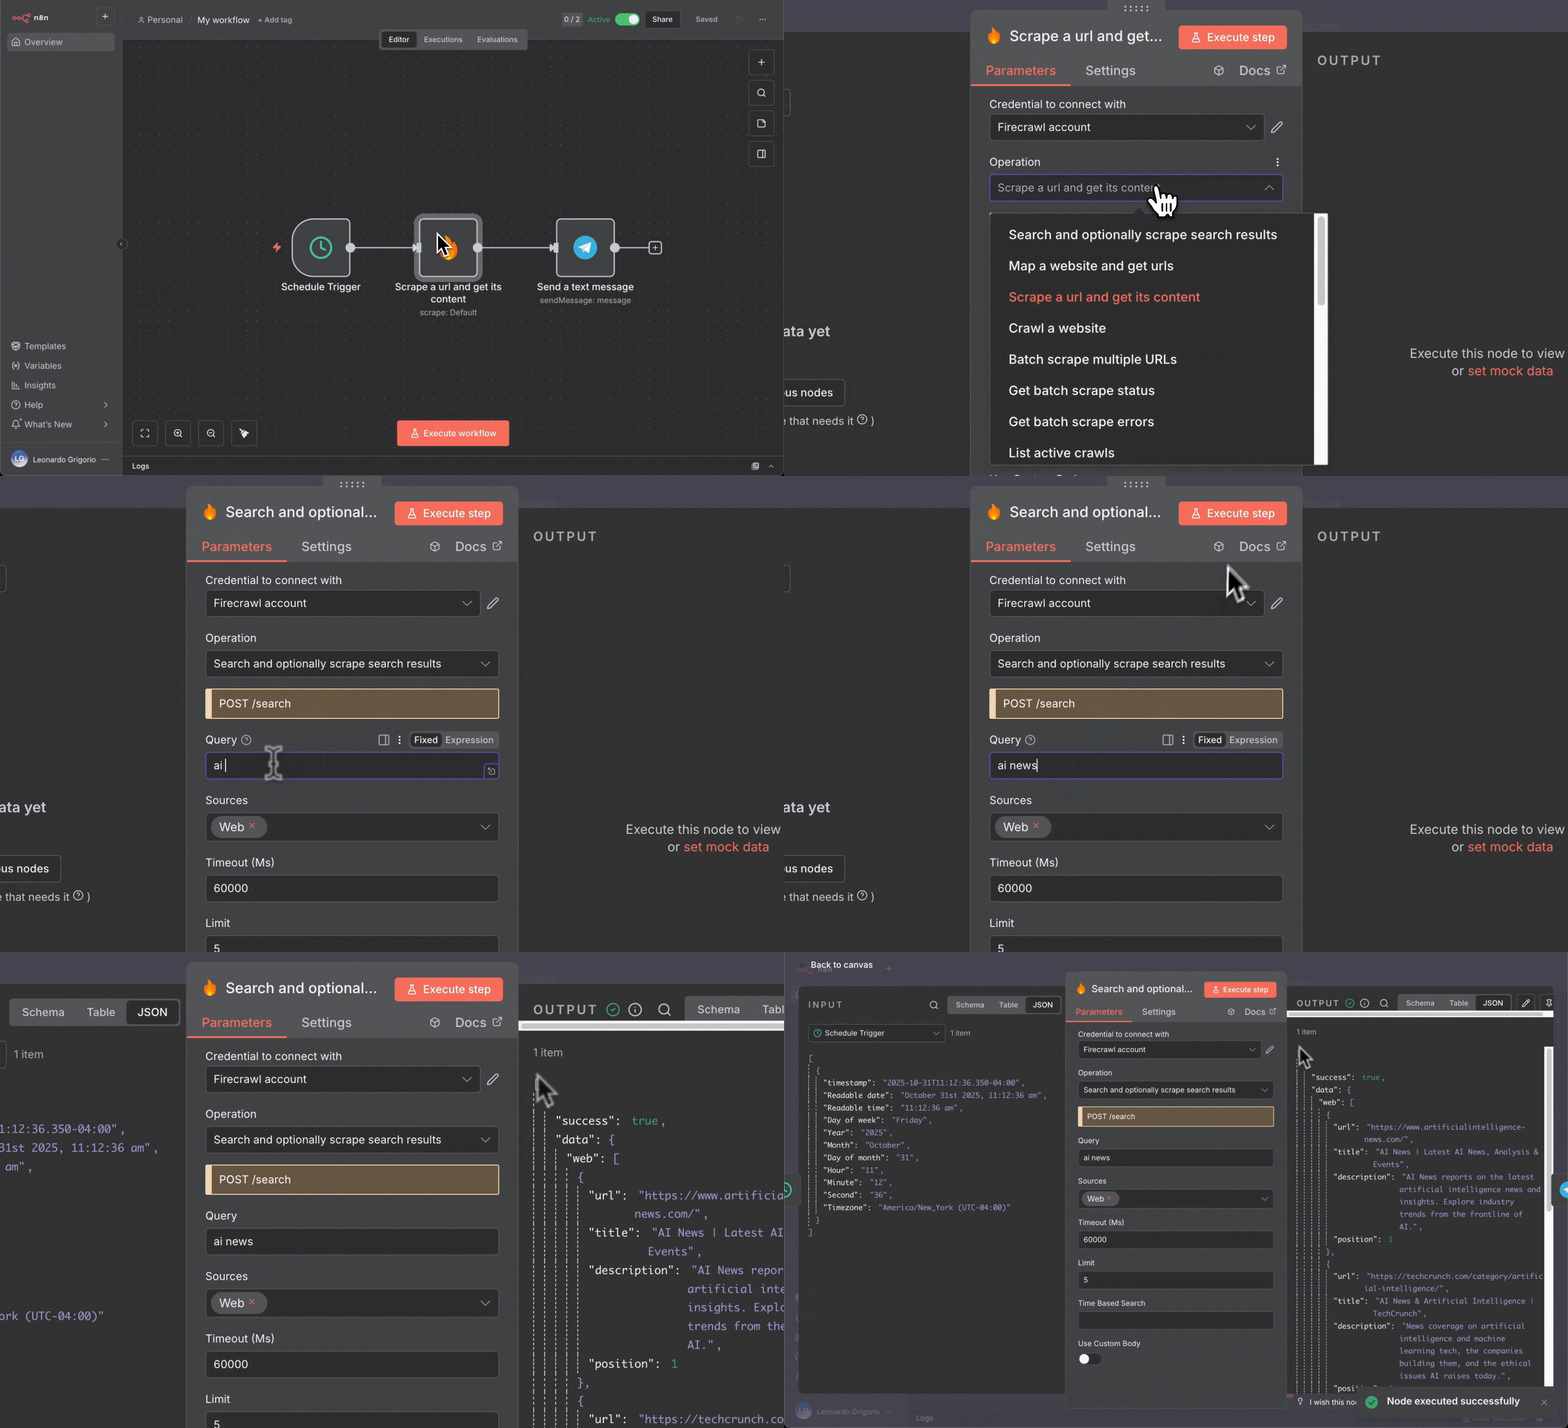
2. Add **Firecrawl** node with these settings:
* **Resource**: Search and optionally scrape search results
* **Query**: `ai news`
* **Limit**: 5
8. Activate the workflow by toggling the "**Active**" switch
Your Telegram bot will now send you a daily summary of Firecrawl product updates every morning at 9 AM.
### Example 2: AI News Search to Telegram
This workflow uses Firecrawl's Search operation to find AI news and send formatted results to Telegram.
**Key differences from Example 1:**
* Uses a **Manual Trigger** instead of Schedule (run on demand)
* Uses **Search** operation instead of Scrape
* Includes a **Code** node to format multiple results
**Build the workflow:**
1. Create a new workflow and add a **Manual Trigger** node
2. Add **Firecrawl** node with these settings:
* **Resource**: Search and optionally scrape search results
* **Query**: `ai news`
* **Limit**: 5
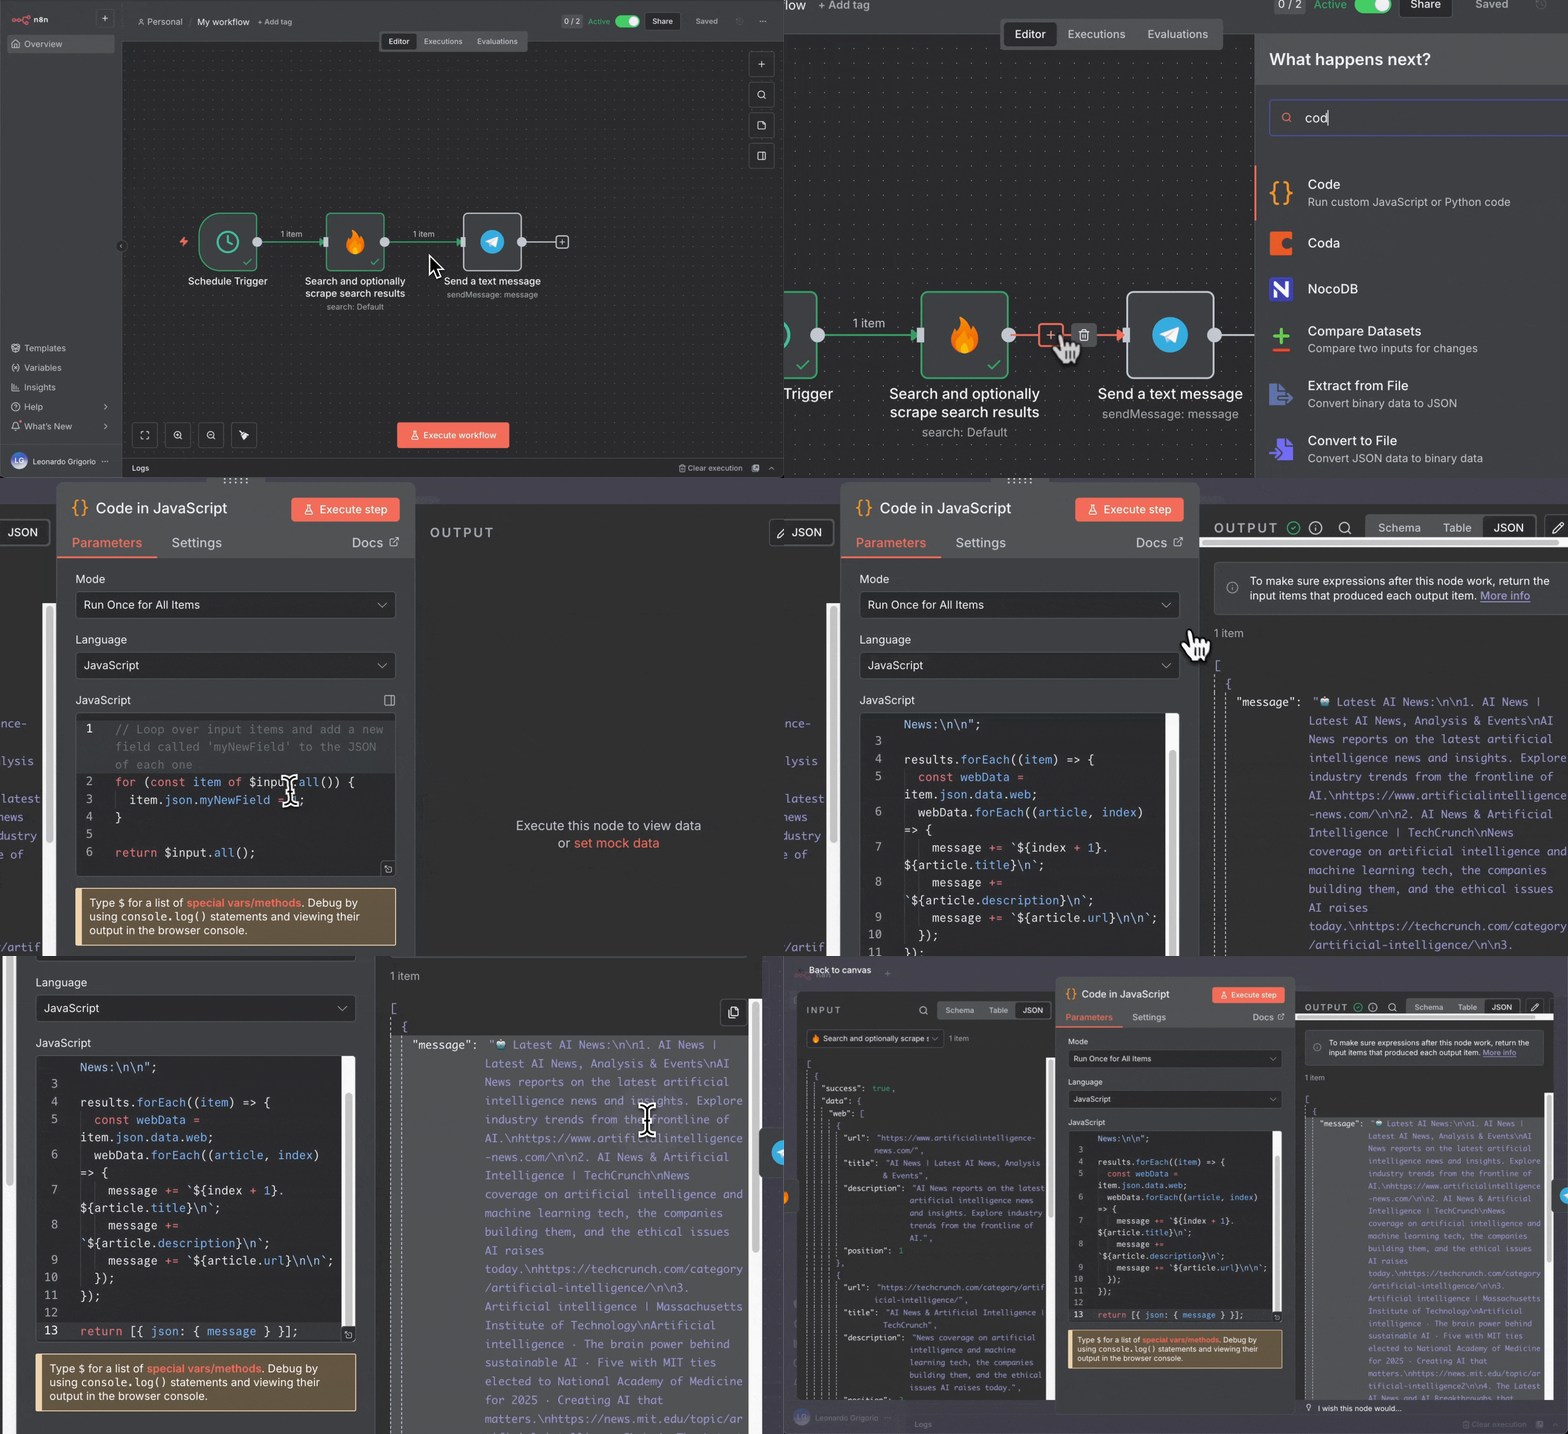
 3. Add a **Code** node to format the search results:
* Select "Run Once for All Items"
* Paste this code:
```javascript theme={null}
const results = $input.all();
let message = "Latest AI News:\n\n";
results.forEach((item) => {
const webData = item.json.data.web;
webData.forEach((article, index) => {
message += `${index + 1}. ${article.title}\n`;
message += `${article.description}\n`;
message += `${article.url}\n\n`;
});
});
return [{ json: { message } }];
```
3. Add a **Code** node to format the search results:
* Select "Run Once for All Items"
* Paste this code:
```javascript theme={null}
const results = $input.all();
let message = "Latest AI News:\n\n";
results.forEach((item) => {
const webData = item.json.data.web;
webData.forEach((article, index) => {
message += `${index + 1}. ${article.title}\n`;
message += `${article.description}\n`;
message += `${article.url}\n\n`;
});
});
return [{ json: { message } }];
```
 4. Update **Telegram** node (using your saved credential):
* **Text**: Drag the `message` field from Code node
4. Update **Telegram** node (using your saved credential):
* **Text**: Drag the `message` field from Code node
 Replace the Manual Trigger with a Schedule Trigger to get automatic AI news updates at set intervals.
### Example 3: AI-Powered News Summary
This workflow adds AI to Example 2, using OpenAI to generate intelligent summaries of the latest AI news before sending to Telegram.
**Key changes from Example 2:**
* Add **OpenAI credentials** setup
* Add **AI Agent** node between Code and Telegram
* AI Agent analyzes and summarizes all the news articles intelligently
* Telegram receives the AI-generated summary instead of raw news list
**Modify the workflow:**
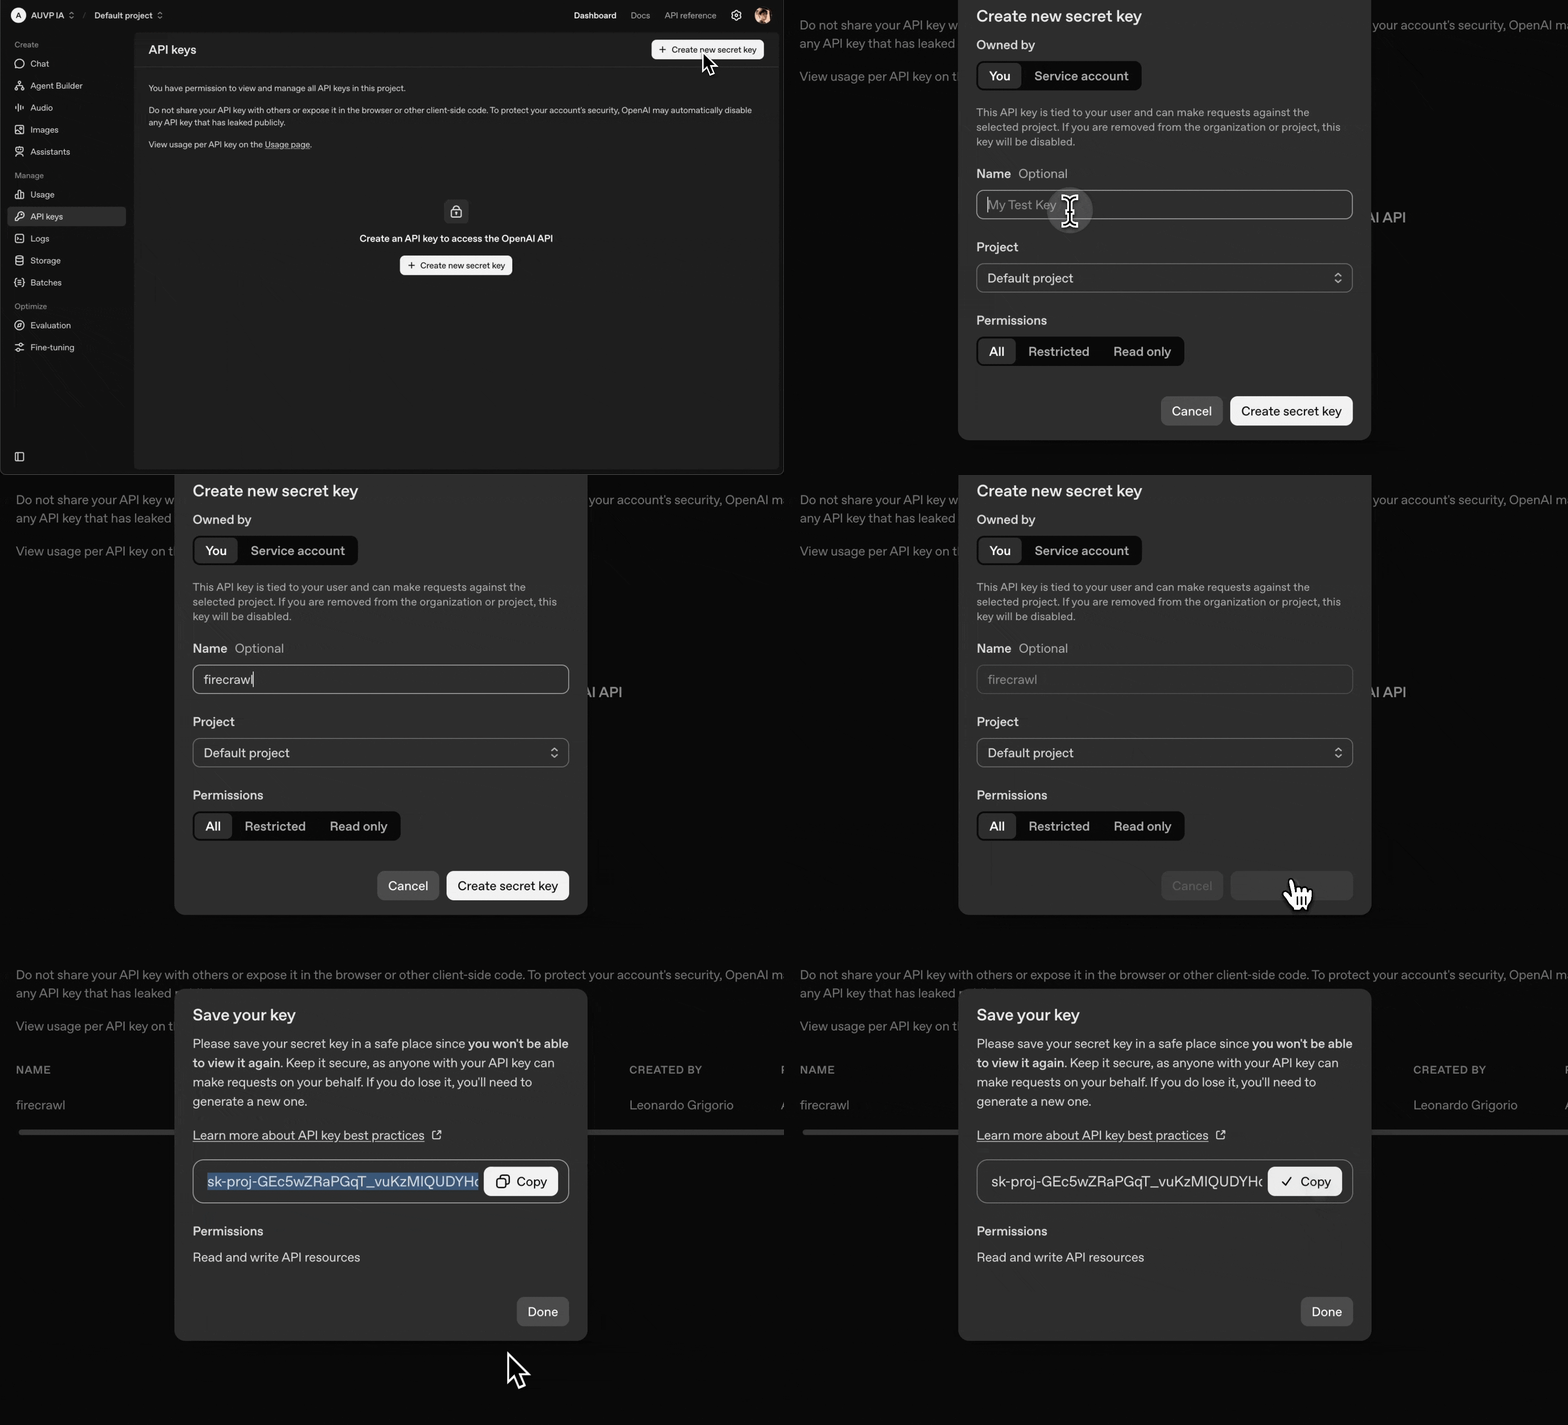
1. **Get your OpenAI API key**:
* Go to [platform.openai.com/api-keys](https://platform.openai.com/api-keys)
* Sign in or create an account
* Click "**Create new secret key**"
* Give it a name (e.g., "n8n Integration")
* Copy the API key immediately (you won't see it again)
Replace the Manual Trigger with a Schedule Trigger to get automatic AI news updates at set intervals.
### Example 3: AI-Powered News Summary
This workflow adds AI to Example 2, using OpenAI to generate intelligent summaries of the latest AI news before sending to Telegram.
**Key changes from Example 2:**
* Add **OpenAI credentials** setup
* Add **AI Agent** node between Code and Telegram
* AI Agent analyzes and summarizes all the news articles intelligently
* Telegram receives the AI-generated summary instead of raw news list
**Modify the workflow:**
1. **Get your OpenAI API key**:
* Go to [platform.openai.com/api-keys](https://platform.openai.com/api-keys)
* Sign in or create an account
* Click "**Create new secret key**"
* Give it a name (e.g., "n8n Integration")
* Copy the API key immediately (you won't see it again)
 2. **Add and connect the AI Agent node**:
* Click "**+**" after the Code node
* Search for "**Basic LLM Chain**" or "**AI Agent**"
* Drag the `message` field from the Code node to the AI Agent's input prompt field
* Select **OpenAI** as the LLM provider
2. **Add and connect the AI Agent node**:
* Click "**+**" after the Code node
* Search for "**Basic LLM Chain**" or "**AI Agent**"
* Drag the `message` field from the Code node to the AI Agent's input prompt field
* Select **OpenAI** as the LLM provider
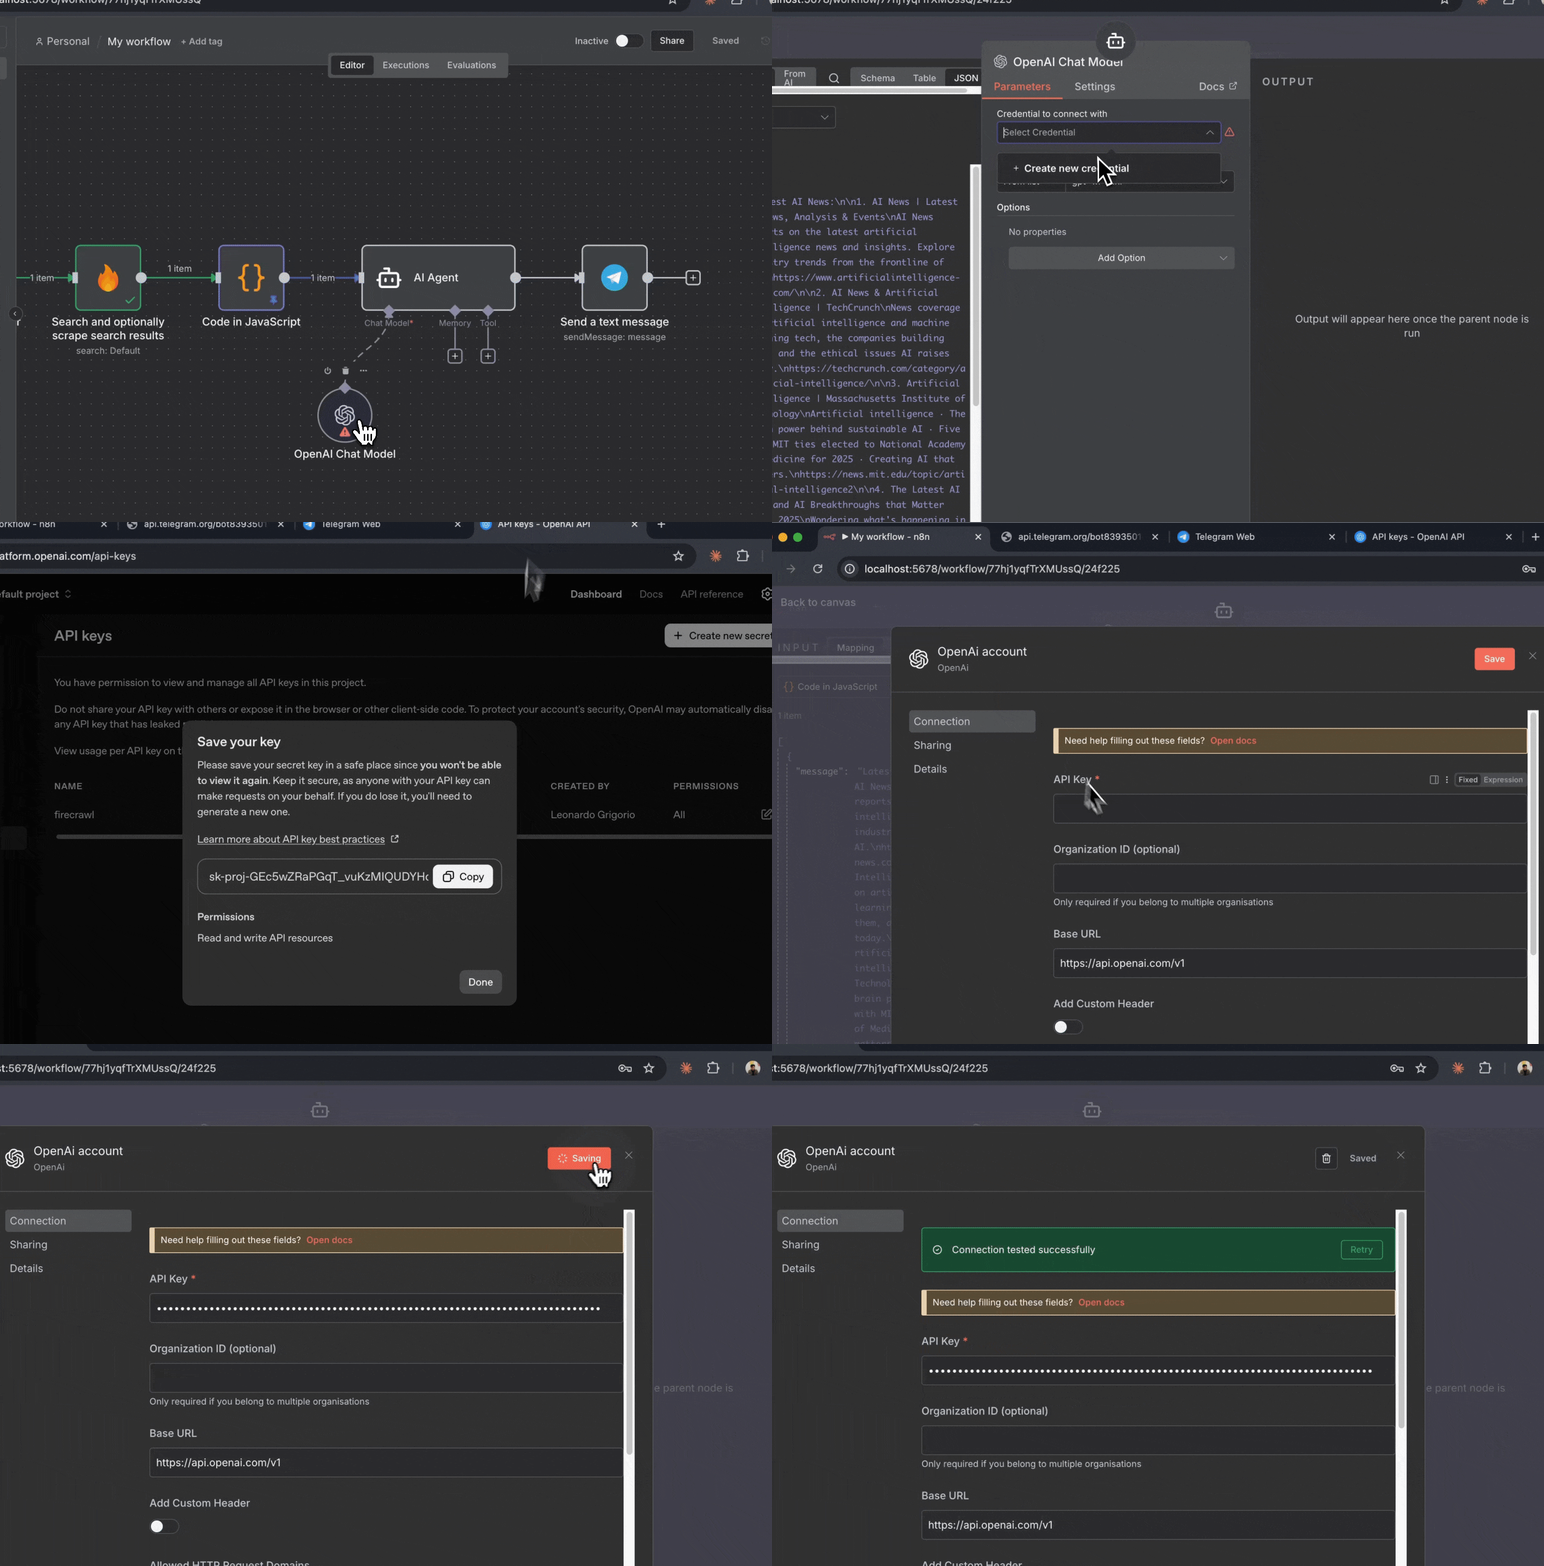
 3. **Add your OpenAI credentials**:
* Click "**Create New Credential**" for OpenAI
* Paste your OpenAI API key
* Select model: **gpt-5-mini** (cost-effective) or **gpt-5** (more capable)
* Click "**Save**"
3. **Add your OpenAI credentials**:
* Click "**Create New Credential**" for OpenAI
* Paste your OpenAI API key
* Select model: **gpt-5-mini** (cost-effective) or **gpt-5** (more capable)
* Click "**Save**"
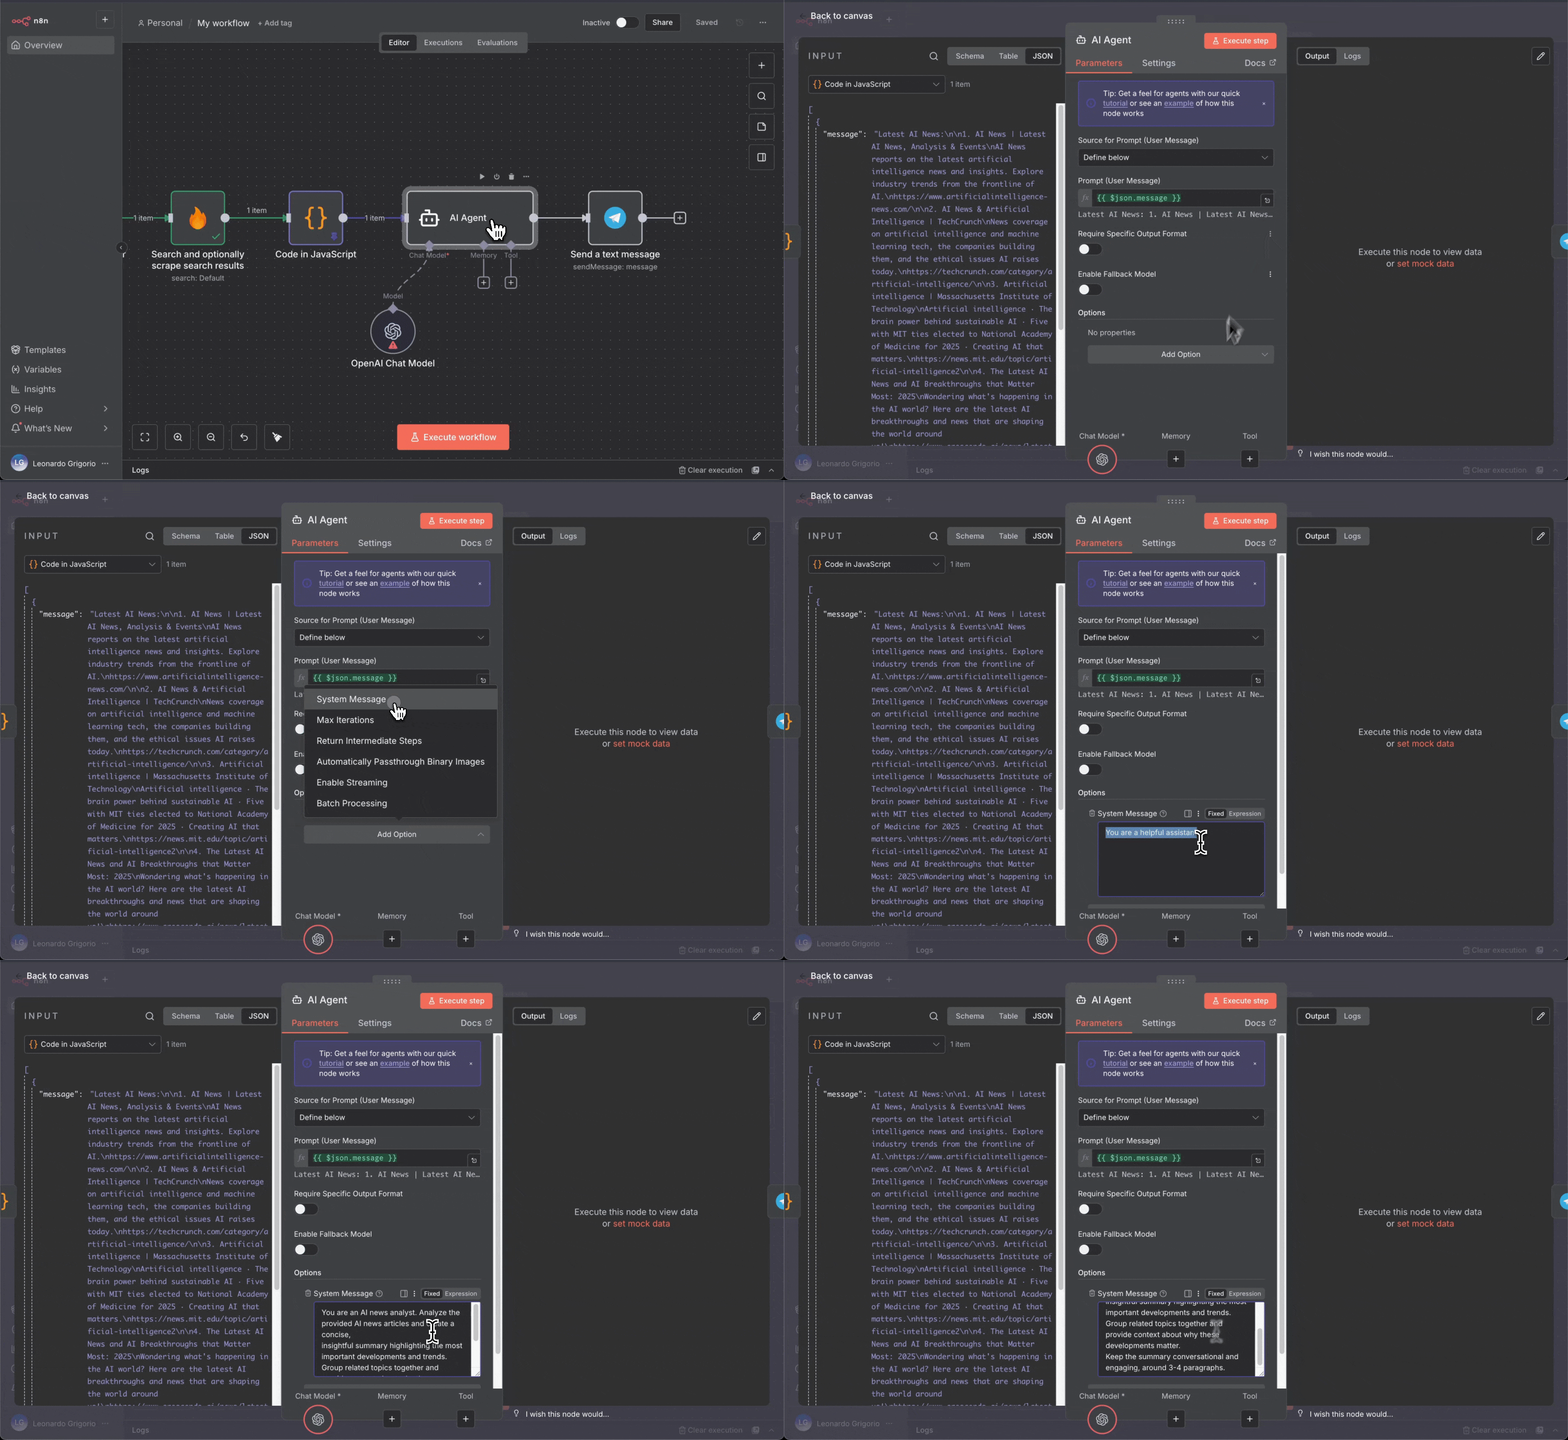
 4. **Add the system prompt to the AI Agent**:
* In the AI Agent node, add this system prompt:
```
You are an AI news analyst. Analyze the provided AI news articles and create a concise,
insightful summary highlighting the most important developments and trends.
Group related topics together and provide context about why these developments matter.
Keep the summary conversational and engaging, around 3-4 paragraphs.
```
4. **Add the system prompt to the AI Agent**:
* In the AI Agent node, add this system prompt:
```
You are an AI news analyst. Analyze the provided AI news articles and create a concise,
insightful summary highlighting the most important developments and trends.
Group related topics together and provide context about why these developments matter.
Keep the summary conversational and engaging, around 3-4 paragraphs.
```
 5. **Update the Telegram node and test**:
* Update the Telegram node:
* **Text**: Drag the AI Agent's output (the generated summary)
* Remove the old mapping to the Code node's message
* Click "**Execute Workflow**" to test
* The AI will analyze all news articles and create a summary
* Check your Telegram for the AI-generated summary
5. **Update the Telegram node and test**:
* Update the Telegram node:
* **Text**: Drag the AI Agent's output (the generated summary)
* Remove the old mapping to the Code node's message
* Click "**Execute Workflow**" to test
* The AI will analyze all news articles and create a summary
* Check your Telegram for the AI-generated summary
 The AI Agent receives all the formatted news articles and creates an intelligent summary, making it easier to understand trends and important developments at a glance.
## Understanding Firecrawl Operations
Now that you've built some workflows, let's explore the different Firecrawl operations available in n8n. Each operation is designed for specific web scraping use cases.
### Scrape a url and get its content
Extracts content from a single web page and returns it in various formats.
**What it does:**
* Scrapes a single URL
* Returns clean markdown, HTML, or AI-generated summaries
* Can capture screenshots and extract links
**Best for:**
* Article extraction
* Product page monitoring
* Blog post scraping
* Generating page summaries
**Example use case:** Daily blog summaries (like Example 1 above)
### Scrape + Interact with persistent profiles
For workflows that use Scrape followed by Interact, set the persistent `profile` on the **Scrape** step. The Interact step only needs the `scrapeId` from the scrape response plus a prompt or code. Do not add `profile` to the Interact request body; Interact inherits the profile from the scrape job.
To save cookies, localStorage, and other browser state, stop the interact session when the workflow is done. If you only need to read an existing profile in a later workflow run, set `saveChanges` to `false` on the Scrape step.
If your installed Firecrawl n8n node version does not expose profile settings on the Scrape operation, update to the latest Firecrawl n8n node. If your n8n version supports custom request or body options for the node, you can pass the same `profile` object there:
```json theme={null}
{
"profile": {
"name": "my-profile",
"saveChanges": true
}
}
```
### Search and optionally scrape search results
Performs web searches and returns results with optional content scraping.
**What it does:**
* Searches the web, news, or images
* Returns titles, descriptions, and URLs
* Optionally scrapes the full content of results
**Best for:**
* Research automation
* News monitoring
* Trend discovery
* Finding relevant content
**Example use case:** AI news aggregation (like Example 2 above)
### Crawl a website
Recursively discovers and scrapes multiple pages from a website.
**What it does:**
* Follows links automatically
* Scrapes multiple pages in one operation
* Can filter URLs by patterns
**Best for:**
* Full documentation extraction
* Site archiving
* Multi-page data collection
### Map a website and get urls
Returns all URLs found on a website without scraping content.
**What it does:**
* Discovers all links on a site
* Returns clean URL list
* Fast and lightweight
**Best for:**
* URL discovery
* Sitemap generation
* Planning larger crawls
### Extract Data
Uses AI to extract structured information based on custom prompts or schemas.
**What it does:**
* AI-powered data extraction
* Returns data in your specified format
* Works across multiple pages
**Best for:**
* Custom data extraction
* Building databases
* Structured information gathering
### Batch Scrape
Scrapes multiple URLs in parallel efficiently.
**What it does:**
* Processes multiple URLs at once
* More efficient than loops
* Returns all results together
**Best for:**
* Processing URL lists
* Bulk data collection
* Large-scale scraping projects
### Agent
Uses an AI agent to autonomously browse and extract data from websites based on a natural language prompt.
**What it does:**
* Accepts a prompt describing what data you need
* AI agent navigates and extracts information autonomously
* Available in **Sync** mode (waits for results) and **Async** mode (returns a job ID immediately)
* Use **Get Agent Status** to poll for results when using Async mode
**Best for:**
* Complex, multi-page data gathering guided by a prompt
* Extracting information when you don't know the exact page structure
* Research tasks that require navigating multiple pages
**Sync vs. Async:**
* **Agent (Sync)** starts the job and waits for the result in one step — simplest for most use cases. The **Max Wait Time** parameter controls how long the node polls before timing out (default: 300 seconds, maximum: 600 seconds). If the agent job takes longer than this, the node returns a timeout status even though the job may still complete on the Firecrawl side. For jobs that may exceed 10 minutes, use the async mode instead.
* **Agent (Async)** returns a job ID immediately. Add a second Firecrawl node with the **Get Agent Status** operation to retrieve results once the job completes.
For details on the agent feature, see the [Agent documentation](/features/agent).
### Browser Sandbox
Provides a persistent browser session that you can control with code, allowing multi-step browser automation within a single session.
**Operations:**
* **Create Browser Session** — starts a new browser session and returns a `sessionId`
* **Execute Browser Code** — runs JavaScript, Python, or bash code in the session (using the `sessionId` from the Create step)
* **List Browser Sessions** — lists active or destroyed sessions
* **Delete Browser Session** — destroys a session when you are done
**Best for:**
* Multi-step browser workflows that require maintaining state across pages
* Dynamic page navigation where the number of steps is not known in advance
* Workflows that use persistent browser profiles to preserve cookies and localStorage across runs
In n8n, select the **Browser** resource on the Firecrawl node to access these operations. Pass the `sessionId` from the Create step into each subsequent Execute or Delete step. Use n8n's **Loop Over Items** node to iterate through a dynamic list of pages, calling Execute for each one within the same session.
For details on the Browser Sandbox feature, see the [Browser Sandbox documentation](/features/browser-sandbox).
## Workflow Templates and Examples
Instead of building from scratch, you can start with pre-built templates. The n8n community has created numerous Firecrawl workflows you can copy and customize.
### Featured Templates
Build an AI chatbot with web access using Firecrawl and n8n
Ready-to-use templates for lead generation, price monitoring, and more
Scrape pages into embeddings and store in Supabase pgvector for RAG
Scrape company websites and extract structured business signals
Scrape pages into embeddings and store in Pinecone for RAG
Browse hundreds of workflows using Firecrawl
View official integration documentation
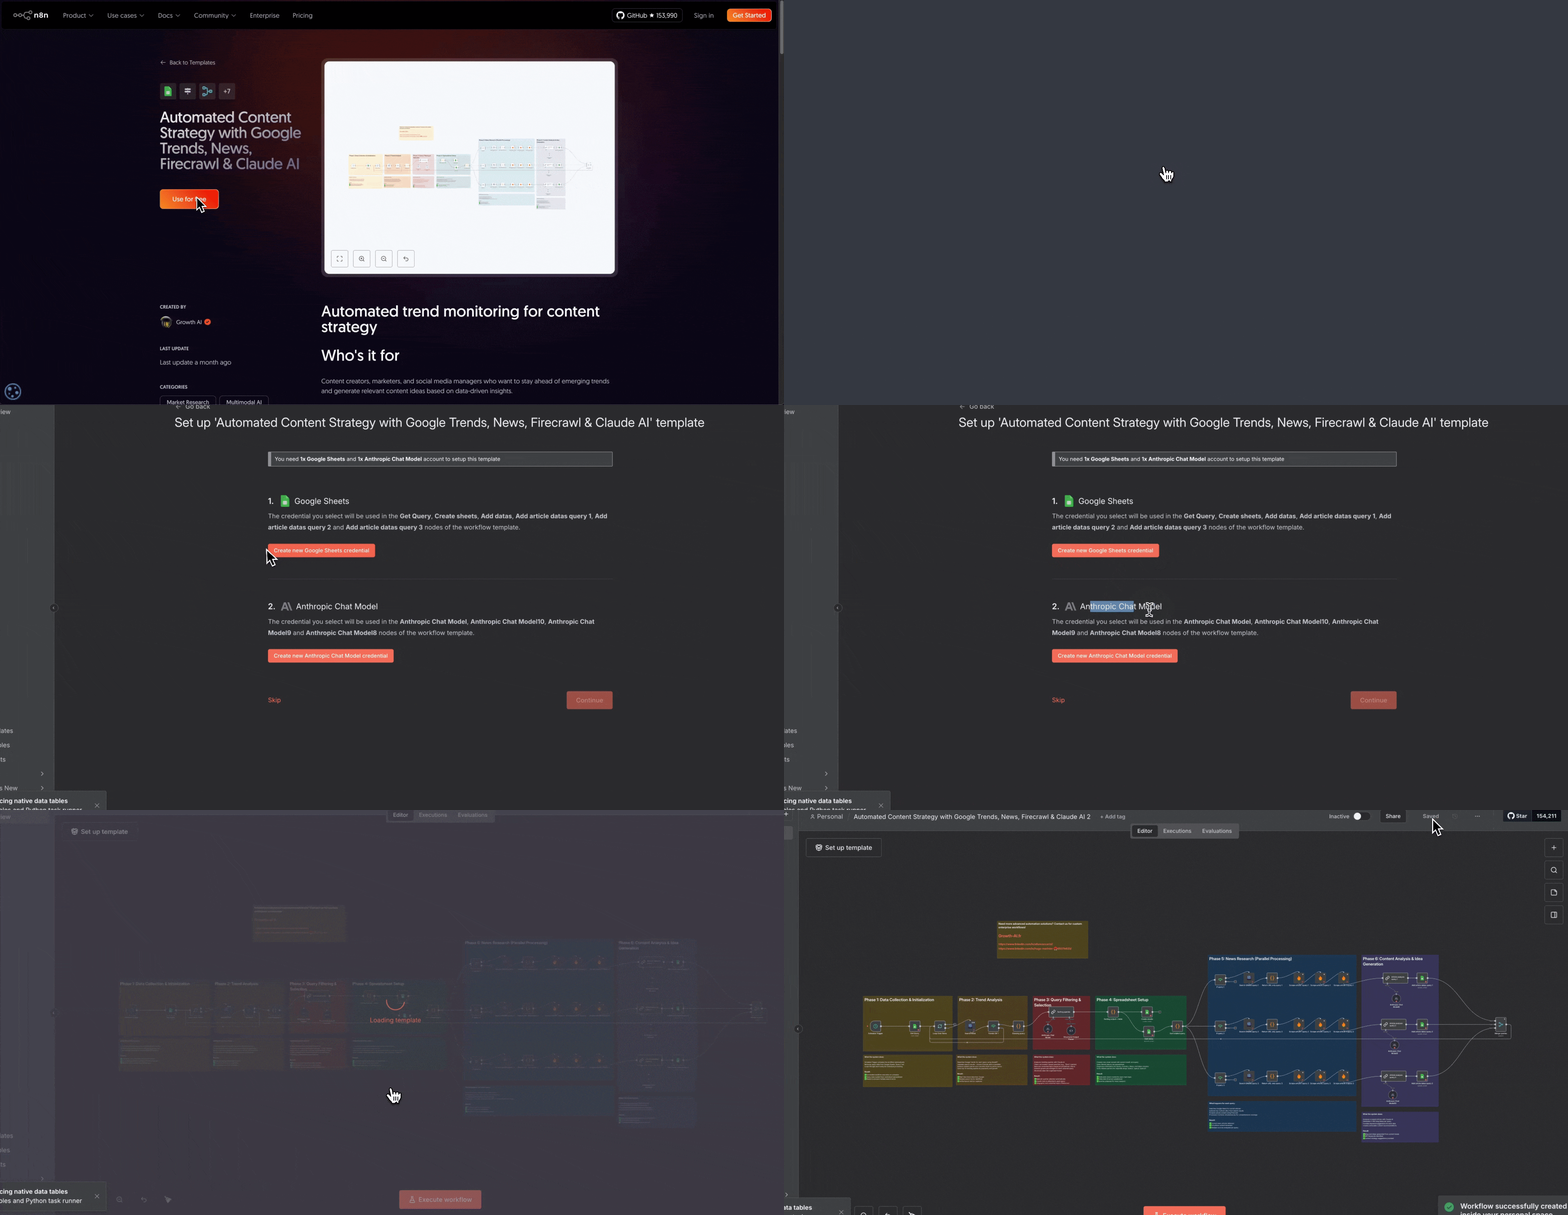
### How to Import Templates
To use a template from the n8n community:
1. Click on a workflow template link
2. Click "**Import template to localhost:5678 self-hosted instance**" button on the template page
3. The workflow opens in your n8n instance
4. Configure credentials for each node
5. Customize settings for your use case
6. Activate the workflow
The AI Agent receives all the formatted news articles and creates an intelligent summary, making it easier to understand trends and important developments at a glance.
## Understanding Firecrawl Operations
Now that you've built some workflows, let's explore the different Firecrawl operations available in n8n. Each operation is designed for specific web scraping use cases.
### Scrape a url and get its content
Extracts content from a single web page and returns it in various formats.
**What it does:**
* Scrapes a single URL
* Returns clean markdown, HTML, or AI-generated summaries
* Can capture screenshots and extract links
**Best for:**
* Article extraction
* Product page monitoring
* Blog post scraping
* Generating page summaries
**Example use case:** Daily blog summaries (like Example 1 above)
### Scrape + Interact with persistent profiles
For workflows that use Scrape followed by Interact, set the persistent `profile` on the **Scrape** step. The Interact step only needs the `scrapeId` from the scrape response plus a prompt or code. Do not add `profile` to the Interact request body; Interact inherits the profile from the scrape job.
To save cookies, localStorage, and other browser state, stop the interact session when the workflow is done. If you only need to read an existing profile in a later workflow run, set `saveChanges` to `false` on the Scrape step.
If your installed Firecrawl n8n node version does not expose profile settings on the Scrape operation, update to the latest Firecrawl n8n node. If your n8n version supports custom request or body options for the node, you can pass the same `profile` object there:
```json theme={null}
{
"profile": {
"name": "my-profile",
"saveChanges": true
}
}
```
### Search and optionally scrape search results
Performs web searches and returns results with optional content scraping.
**What it does:**
* Searches the web, news, or images
* Returns titles, descriptions, and URLs
* Optionally scrapes the full content of results
**Best for:**
* Research automation
* News monitoring
* Trend discovery
* Finding relevant content
**Example use case:** AI news aggregation (like Example 2 above)
### Crawl a website
Recursively discovers and scrapes multiple pages from a website.
**What it does:**
* Follows links automatically
* Scrapes multiple pages in one operation
* Can filter URLs by patterns
**Best for:**
* Full documentation extraction
* Site archiving
* Multi-page data collection
### Map a website and get urls
Returns all URLs found on a website without scraping content.
**What it does:**
* Discovers all links on a site
* Returns clean URL list
* Fast and lightweight
**Best for:**
* URL discovery
* Sitemap generation
* Planning larger crawls
### Extract Data
Uses AI to extract structured information based on custom prompts or schemas.
**What it does:**
* AI-powered data extraction
* Returns data in your specified format
* Works across multiple pages
**Best for:**
* Custom data extraction
* Building databases
* Structured information gathering
### Batch Scrape
Scrapes multiple URLs in parallel efficiently.
**What it does:**
* Processes multiple URLs at once
* More efficient than loops
* Returns all results together
**Best for:**
* Processing URL lists
* Bulk data collection
* Large-scale scraping projects
### Agent
Uses an AI agent to autonomously browse and extract data from websites based on a natural language prompt.
**What it does:**
* Accepts a prompt describing what data you need
* AI agent navigates and extracts information autonomously
* Available in **Sync** mode (waits for results) and **Async** mode (returns a job ID immediately)
* Use **Get Agent Status** to poll for results when using Async mode
**Best for:**
* Complex, multi-page data gathering guided by a prompt
* Extracting information when you don't know the exact page structure
* Research tasks that require navigating multiple pages
**Sync vs. Async:**
* **Agent (Sync)** starts the job and waits for the result in one step — simplest for most use cases. The **Max Wait Time** parameter controls how long the node polls before timing out (default: 300 seconds, maximum: 600 seconds). If the agent job takes longer than this, the node returns a timeout status even though the job may still complete on the Firecrawl side. For jobs that may exceed 10 minutes, use the async mode instead.
* **Agent (Async)** returns a job ID immediately. Add a second Firecrawl node with the **Get Agent Status** operation to retrieve results once the job completes.
For details on the agent feature, see the [Agent documentation](/features/agent).
### Browser Sandbox
Provides a persistent browser session that you can control with code, allowing multi-step browser automation within a single session.
**Operations:**
* **Create Browser Session** — starts a new browser session and returns a `sessionId`
* **Execute Browser Code** — runs JavaScript, Python, or bash code in the session (using the `sessionId` from the Create step)
* **List Browser Sessions** — lists active or destroyed sessions
* **Delete Browser Session** — destroys a session when you are done
**Best for:**
* Multi-step browser workflows that require maintaining state across pages
* Dynamic page navigation where the number of steps is not known in advance
* Workflows that use persistent browser profiles to preserve cookies and localStorage across runs
In n8n, select the **Browser** resource on the Firecrawl node to access these operations. Pass the `sessionId` from the Create step into each subsequent Execute or Delete step. Use n8n's **Loop Over Items** node to iterate through a dynamic list of pages, calling Execute for each one within the same session.
For details on the Browser Sandbox feature, see the [Browser Sandbox documentation](/features/browser-sandbox).
## Workflow Templates and Examples
Instead of building from scratch, you can start with pre-built templates. The n8n community has created numerous Firecrawl workflows you can copy and customize.
### Featured Templates
Build an AI chatbot with web access using Firecrawl and n8n
Ready-to-use templates for lead generation, price monitoring, and more
Scrape pages into embeddings and store in Supabase pgvector for RAG
Scrape company websites and extract structured business signals
Scrape pages into embeddings and store in Pinecone for RAG
Browse hundreds of workflows using Firecrawl
View official integration documentation
### How to Import Templates
To use a template from the n8n community:
1. Click on a workflow template link
2. Click "**Import template to localhost:5678 self-hosted instance**" button on the template page
3. The workflow opens in your n8n instance
4. Configure credentials for each node
5. Customize settings for your use case
6. Activate the workflow
 ## Best Practices
Follow these guidelines to build reliable, efficient workflows:
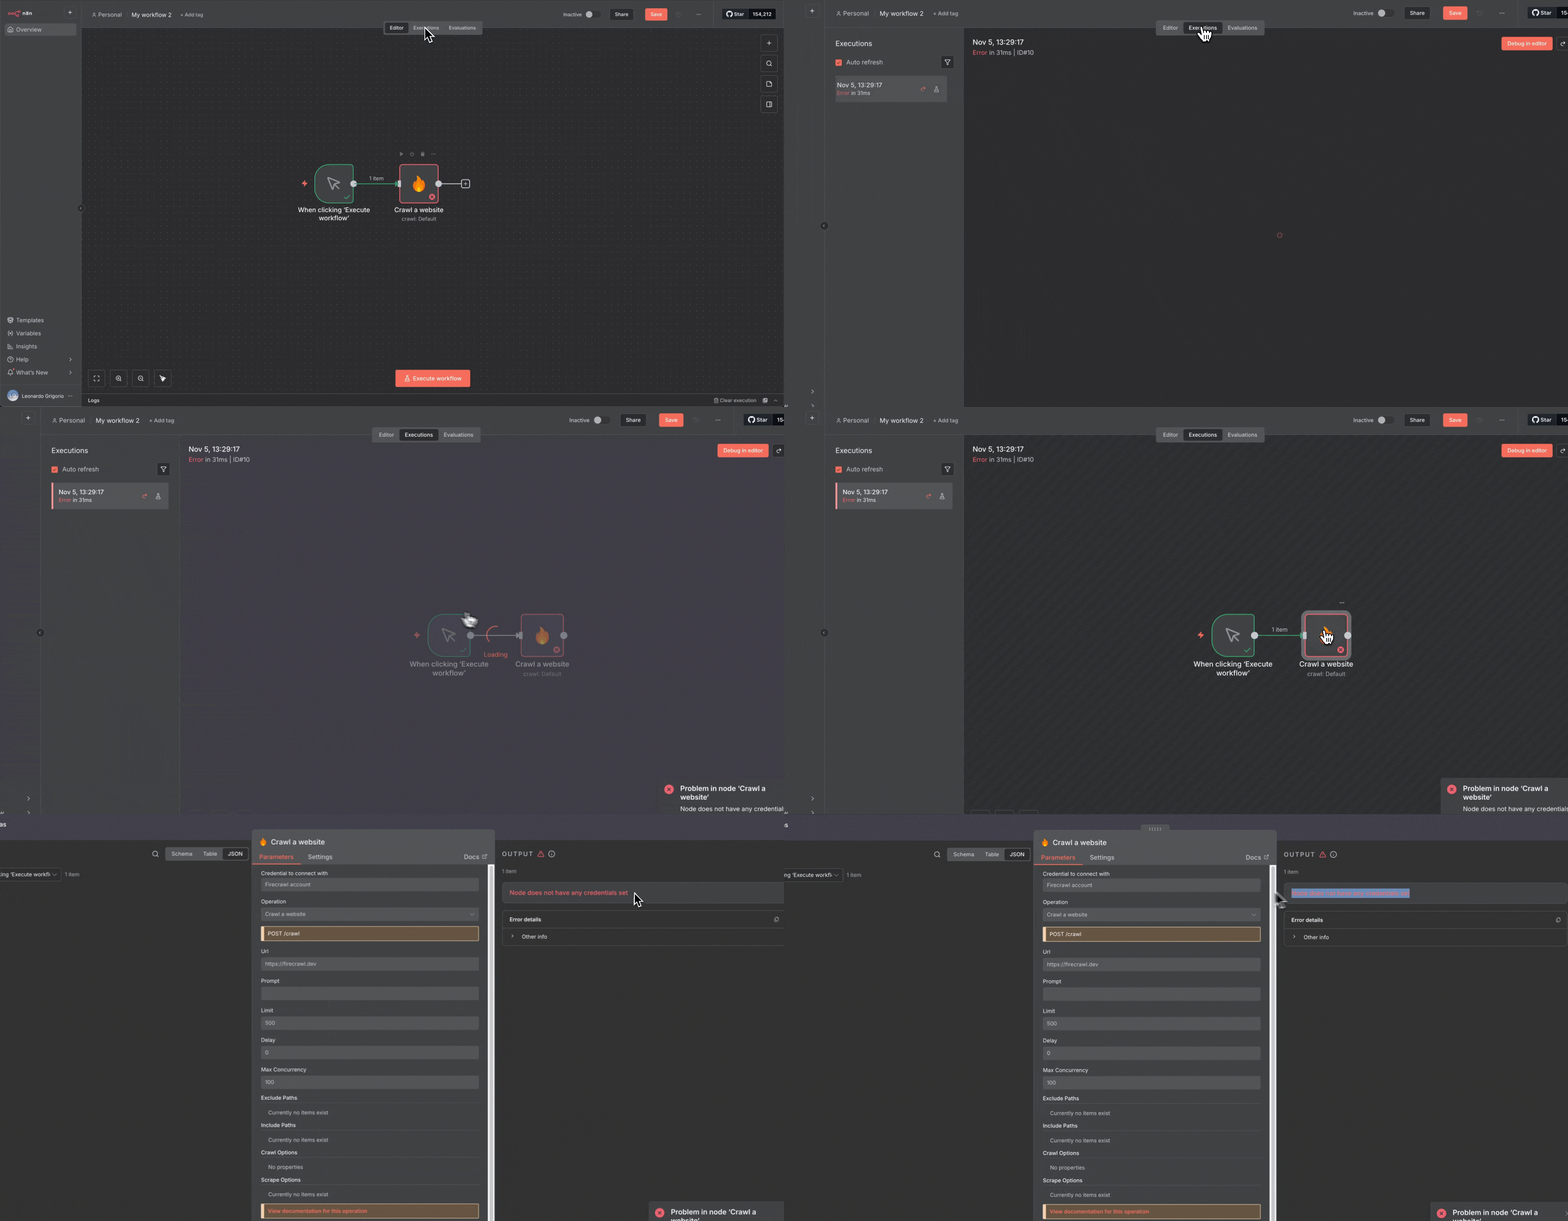
### Testing and Debugging
* Always test workflows manually before activating schedules
* Use the "**Execute Workflow**" button to test the entire flow
* Check output data at each node to verify correctness
* Use the "**Executions**" tab to review past runs and debug issues
## Best Practices
Follow these guidelines to build reliable, efficient workflows:
### Testing and Debugging
* Always test workflows manually before activating schedules
* Use the "**Execute Workflow**" button to test the entire flow
* Check output data at each node to verify correctness
* Use the "**Executions**" tab to review past runs and debug issues
 ### Error Handling
* Add Error Trigger nodes to catch and handle failures
* Set up notifications when workflows fail
* Use the "**Continue On Fail**" setting for non-critical nodes
* Monitor your workflow executions regularly
### Performance Optimization
* Use Batch Scrape for multiple URLs instead of loops
* Set appropriate rate limits to avoid overwhelming target sites
* Cache data when possible to reduce unnecessary requests
* Schedule intensive workflows during off-peak hours
### Security
* Never expose API keys in workflow configurations
* Use n8n's credential system to securely store authentication
* Be careful when sharing workflows publicly
* Follow target websites' terms of service and robots.txt
## Next Steps
You now have the fundamentals to build web scraping automations with Firecrawl and n8n. Here's how to continue learning:
### Explore Advanced Features
* Study webhook configurations for real-time data processing
* Experiment with AI-powered extraction using prompts and schemas
* Build complex multi-step workflows with branching logic
### Join the Community
* [Firecrawl Discord](https://discord.gg/firecrawl) - Get help with Firecrawl and discuss web scraping
* [n8n Community Forum](https://community.n8n.io/) - Ask questions about workflow automation
* Share your workflows and learn from others
### Recommended Learning Path
1. Complete the example workflows in this guide
2. Modify templates from the community library
3. Build a workflow to solve a real problem in your work
4. Explore advanced Firecrawl operations
5. Contribute your own templates to help others
**Need help?** If you're stuck or have questions, the Firecrawl and n8n communities are active and helpful. Don't hesitate to ask for guidance as you build your automations.
## Additional Resources
* [Firecrawl API Documentation](/api-reference/v2-introduction)
* [n8n Documentation](https://docs.n8n.io/)
* [Web Scraping Best Practices](https://www.firecrawl.dev/blog)
### Error Handling
* Add Error Trigger nodes to catch and handle failures
* Set up notifications when workflows fail
* Use the "**Continue On Fail**" setting for non-critical nodes
* Monitor your workflow executions regularly
### Performance Optimization
* Use Batch Scrape for multiple URLs instead of loops
* Set appropriate rate limits to avoid overwhelming target sites
* Cache data when possible to reduce unnecessary requests
* Schedule intensive workflows during off-peak hours
### Security
* Never expose API keys in workflow configurations
* Use n8n's credential system to securely store authentication
* Be careful when sharing workflows publicly
* Follow target websites' terms of service and robots.txt
## Next Steps
You now have the fundamentals to build web scraping automations with Firecrawl and n8n. Here's how to continue learning:
### Explore Advanced Features
* Study webhook configurations for real-time data processing
* Experiment with AI-powered extraction using prompts and schemas
* Build complex multi-step workflows with branching logic
### Join the Community
* [Firecrawl Discord](https://discord.gg/firecrawl) - Get help with Firecrawl and discuss web scraping
* [n8n Community Forum](https://community.n8n.io/) - Ask questions about workflow automation
* Share your workflows and learn from others
### Recommended Learning Path
1. Complete the example workflows in this guide
2. Modify templates from the community library
3. Build a workflow to solve a real problem in your work
4. Explore advanced Firecrawl operations
5. Contribute your own templates to help others
**Need help?** If you're stuck or have questions, the Firecrawl and n8n communities are active and helpful. Don't hesitate to ask for guidance as you build your automations.
## Additional Resources
* [Firecrawl API Documentation](/api-reference/v2-introduction)
* [n8n Documentation](https://docs.n8n.io/)
* [Web Scraping Best Practices](https://www.firecrawl.dev/blog)